Customer Management
CRE Loaded automatically maintains complete records on all of your customers. You can sort and edit customer records, see how often they visit your store, what they have bought from you, even send them an email -- all from one simple menu.
1. Add a New Customer
When a customer places an order online, CRE Loaded asks him or her to create a customer account (unless you let customers place orders without an account -- see Order Processing and Management: Checkout Configuration). But if you have a brick-and-mortar store, or if a customer places an order over the phone, you can add a record for them yourself.
To add a new customer, got to Admin => Customers/Orders => Create Account and enter the customer's information. Note that the screens say "Your Personal Details," "Your Address," etc. -- that is because this is the same screen that customers see when they are creating their own account. If you are creating an account for a customer, enter their information here, not yours.
For information about Customer Groups, see Section 7 below.
When you are done, click "Confirm" to add the customer to your database.
2. Edit a Customer
All of your customer records are managed from one menu, at Admin => Customers/Orders => Customers:

Clicking on the up or down arrows above each data field lets you sort all customer records by that field. This makes it easy to find all customers with a certain company, or all wholesale customers, or even all customers who have created accounts within the last month, etc.
Once you have found the customer whose record you want to edit, highlight the customer and click "Edit." This will display the same screen you saw when adding a customer -- but with all of the existing customer's information filled in. Simply make whatever changes are necessary and click "Update."
3. Delete a Customer
If for any reason you ever want to delete a customer from your database, simply highlight their record in Admin => Customers/Orders => Customers and click "Delete."
4. Create a New Customer Order
There are two ways to create an order:
1) In Admin => Customers/Orders => Customers, select the customer's record and click "Create Order."
2) In Admin => Customers/Orders => Create Order, select the customer from the drop-down menu.
Whichever method you choose, you will see this screen with the customer's account information:
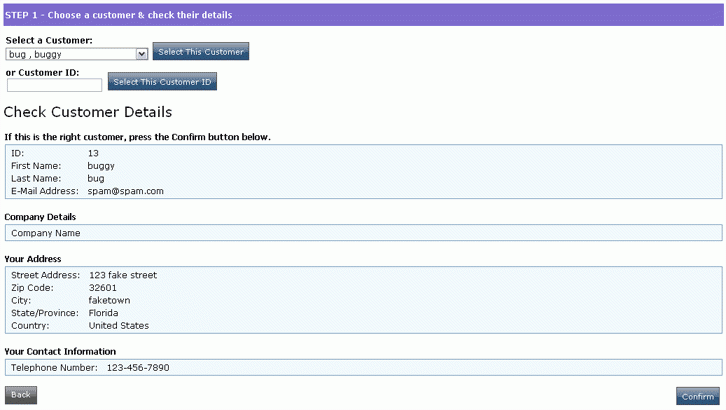
If this is the correct customer record, click "Confirm."
This takes you to Step 2, which is a very long screen. The top portion of the screen lets you confirm the customer's billing and shipping addresses:
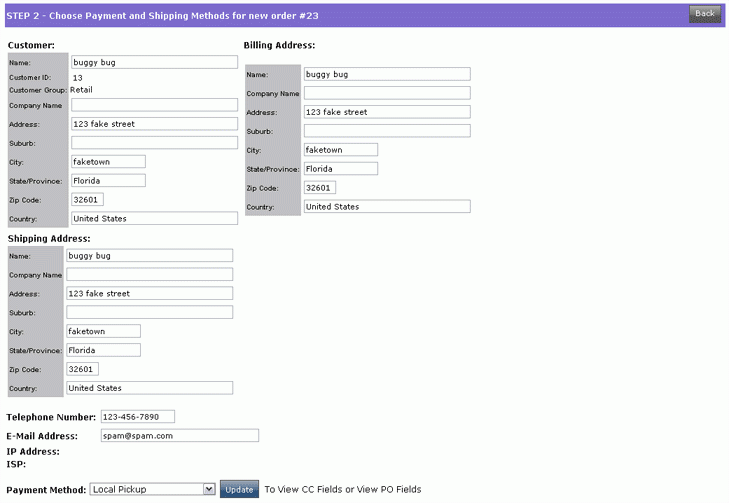
Be sure to select the correct payment method at the bottom of this section.
In the bottom portion of the screen for Step 2, you add products to the costumer's shopping cart.
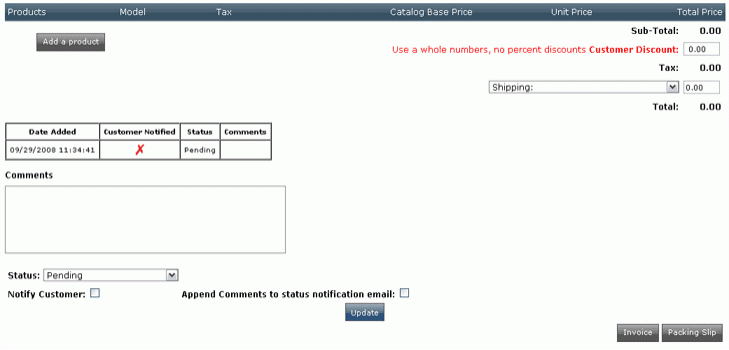
Click "Add Product" to begin creating the customer’s order. You will select products from drop-down menus, select any options, and add them to the order much as you would if you were shopping for yourself.
When you have added all of the products the customers is ordering, enter any discount, select a shipping method, and verbally confirm the order and the total with your customer. If you want a confirmation email sent to the customer, select "Notify Customer"; you can also enter any comments in the box and click "Append comments to status notification email."
Click "Update" to place the order. The red X in the "Customer Notified" box should now have changed to a green check mark. You can also print an invoice and a packing slip from this page.
5. View and Edit Customer Orders
To view a customer's orders, highlight that customer and click "Orders." This will show you a list of every order the customer has placed. To view or edit a particular order, highlight it and click "Edit Order." This will take you to the screen shown above, with all of the information in place. From here you can change the Order Status or Payment Method, edit the order itself to add or remove Products, print an invoice or packing slip, etc.
6. Email a Customer
If you want to send an email to a customer for any reason -- to let him know that his order has been shipped, or that a product has been back ordered, for instance -- highlight the customer and click "Email," then write your message and click "Send Mail."
7. Create Customer Groups (CRE Loaded Pro B2B only)
CRE Loaded Pro B2B gives you the ability to create and manage customer groups such as wholesale customers, employees, shoppers club customers, etc. With customer groups, you can offer different pricing structures or even different product choices to different groups.
To create customer groups, go to Admin => Customers/Orders => Customer Groups:
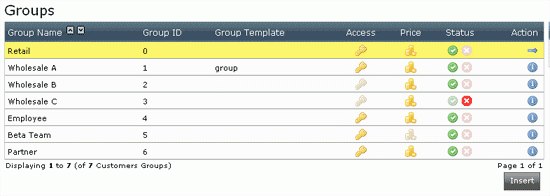
To create a new customer group, click "Insert."
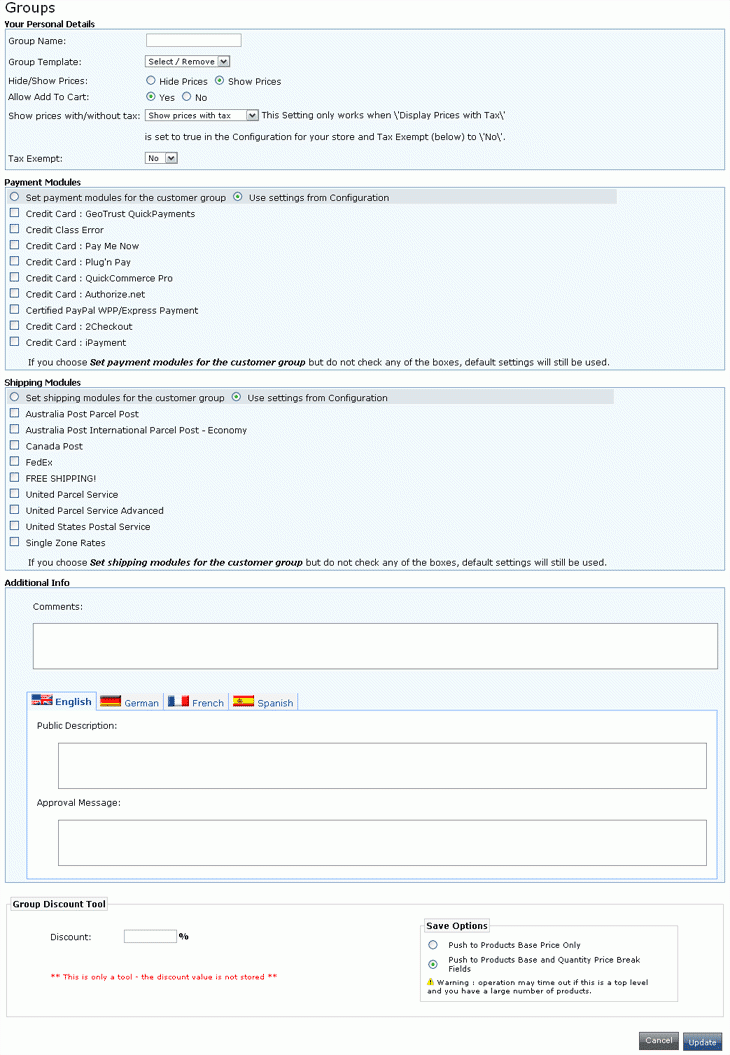
Enter the necessary information and click "Update." You can set special payment and shipping options here that apply only to that group -- for instance, if you will allow employees to pay by personal check or if they will always receive free shipping.
If you enter a value in the Group Discount Tool "Discount" field, customers in this group will receive that percentage discount on all merchandise. You can select "Push to Products Base Price Only" to nullify any quantity-based price discounts and apply only this group discount no matter what quantity is ordered, or you can select "Push to Products Base and Quantity Price Break Fields" to apply the group discount in addition to quantity price break discounts. (Note: this feature is available only in CRE Loaded 6.3.)
Once you have created a customer group, you will need to set the pricing discount options for each Product. See Volume and Group Discounts in Section 4.3 of Creating Your Catalog - Advanced Product Management.
To edit an existing group, highlight the group and click "Edit." You will see the screen above with the customer group’s information filled in. Make any changes you want and click "Update."
To add a customer to a group, simply edit that customer’s record (see Section 2 above) and select the group from the drop-down menu in the "Options" section of their record.

