Set Up Your Store: Section I
Log onto your store's main administration page ("Admin") at http://www.mystore.com/admin. (Everything you do with your store you'll do through your Admin, so you may want to bookmark this page.) Note that as a security precaution, the store will log you out after about 15 minutes of inactivity, so throughout your setup be sure to save your work every few minutes or any unsaved changes will be lost! (If you are using CRE Loaded 6.3, you can set this "Session Lifetime" to any length you want -- we will cover that shortly.)
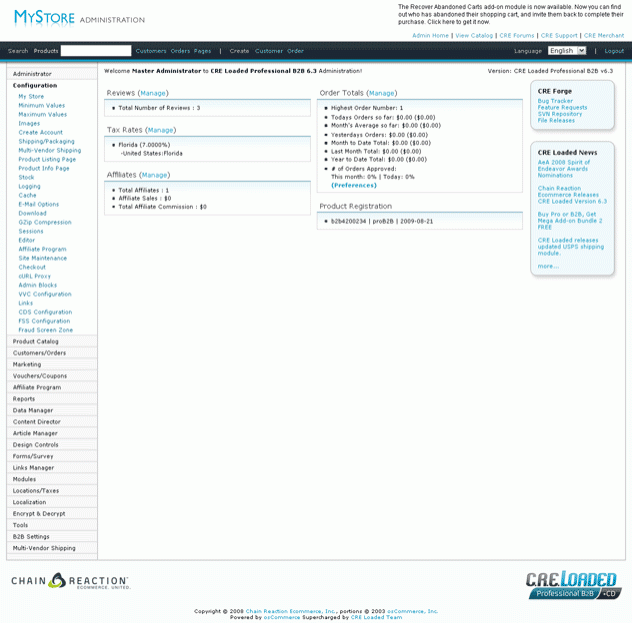
Once you enter your email address and password, you will see this screen:

If you click on View Catalog in the top bar, you will see your current catalog. (Hint: You can use this any time to see how changes you are making affect your site.) Surprise! Instead of a blank page, your unmodified site is set up as a catalog for CRE Loaded. Pretty sneaky of us, huh? Actually, having a functioning store already in place will make it easier for you figure out where things are and how to set up your own product listings, etc.
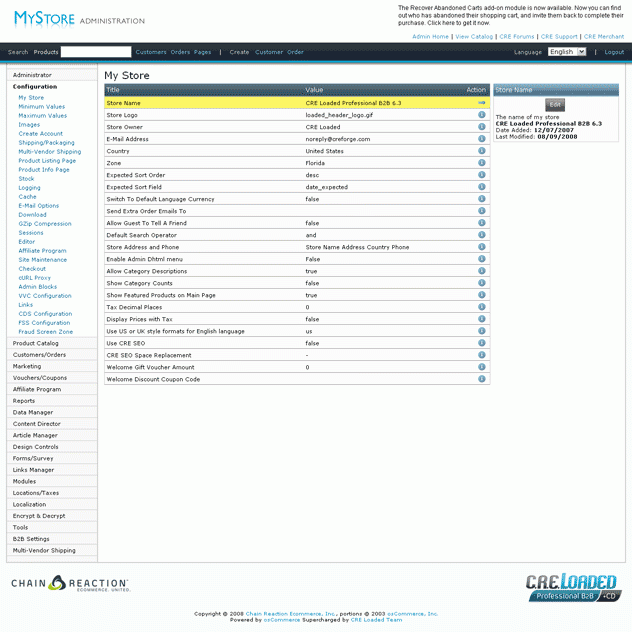
Use your browser's Back button to return to your Admin. In the left-hand column, click on Configuration. This page will appear:

Don't worry -- most of this you're going to leave alone for now.
The first line, "Store Name," is highlighted. Notice how the "Action" column has a ![]() in it instead of a
in it instead of a ![]() , and the right-hand column says "Store Name" and has an "Edit" button in it.
, and the right-hand column says "Store Name" and has an "Edit" button in it.
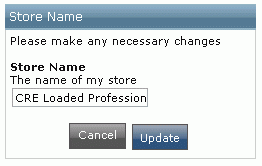
Click on "Edit," and this screen appears:

with a space for you to add your store name. Just type right over the default "CRE Loaded Store" and click "Update."
And that's all it takes! You change just about everything in your Admin this way -- just click on an item (or on the ![]() in the Action column), then click "Edit" to change the information.
in the Action column), then click "Edit" to change the information.
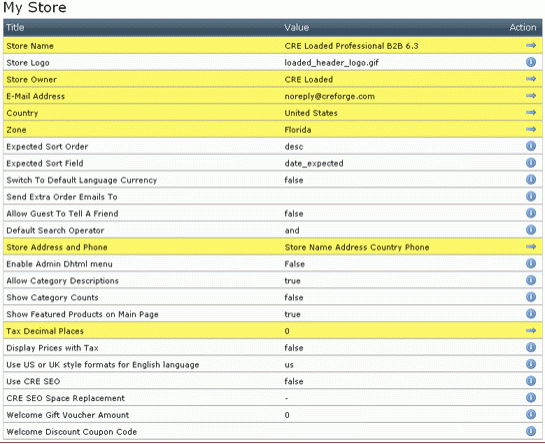
For right now, all you need to change are the highlighted items:

These fields should all be self-explanatory, except perhaps "Tax Decimal Places." This is simply the number of decimal places you want to display for your customers when figuring sales tax -- probably 2.
If you are using CRE Loaded 6.3 and you want to change the length of your Session Lifetime (the amount of time you have before your Admin automatically logs you out for security reasons), select Session, highlight "Session Lifetime," and click "Edit." Enter the amount of time in seconds that you want your Admin Sessions to last. Click "Update" when you are done.
Now select Modules from your main Admin menu.
This takes you to the "Payment Modules" screen. If you already have a credit card processing account, install the module(s) for the third-party processor(s) you use. (The module that is just called "Credit Card" is for manual processing of cards.) Also install the modules for any other payment methods you want to use, such as PayPal, Check/Money Order, etc. Complete information about payment processing modules is in Order Processing and Management, Checkout Configuration.
Every module you install will give you a list of options to edit -- account numbers, routing info, things like that. It's a good idea to have all of that information handy before you start installing the modules.
Once you have your Payment Modules installed, click on "Shipping" under the Modules menu. Shipping Modules will allow a customer to choose a method of shipping when he places an order, and allow you to automatically calculate shipping charges. You will need to have an account with FedEx, UPS, etc., to use these shipping modules. Complete information about shipping modules is in Order Processing and Management, Shipping.
If you would rather charge a flat rate per item or per order for shipping, install the appropriate module.
To automatically calculate taxes, click Locations/Taxes in your Admin menu and select "Tax Zones" (not "Zones"). Florida is installed as a default (it’s where CRE Loaded was founded) -- if your store is located in Florida, you’re all set. Otherwise, delete Florida and insert your location by clicking "Insert" and entering your Zone Name in the box.
In "Tax Classes," there is already an entry for "Taxable Goods." This should be sufficient for most needs, but if you have other tax classes you need to charge, you can create them here.
Now click on "Tax Rates" and enter the sales tax you need to charge for each Tax Class.
One final very important step is setting up the currencies you want to use. In your Admin, click on Localization to see this menu:

CRE Loaded installs with the U.S. dollar as the default currency (the currency in which all prices will be displayed unless Customers specifically choose a different one), and also with the British pound and the Euro.
To change the default currency for your site, highlight the currency you want to use as the default and click "Edit." At the bottom of the Edit menu is a box called "Set as site default." Just click this box and click "Update."
To add a new currency, click "New Currency" and enter the necessary information. Click "Insert" when you are done.
To delete a currency that you don’t want to use, highlight the currency and click "Delete."
 |
If you are going to use more than one currency, be sure to update the exchange rates every day. You do this by clicking "Update Currencies" -- all exchange rates will automatically be checked and updated at once. |
And that (finally!) is it for the "back office" configuration. See, we told you it was easy!

