Set Up Your Store: Section III
Before we start adding products to your catalog, take a few moments to create a list of all of the categories you plan to sell, and the products in each category (if you don't have such a list already). This will make things go faster.
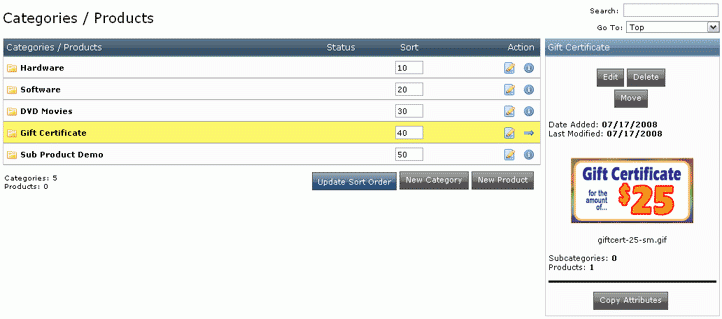
Complete instructions for creating and managing categories and products are in the Creating Your Catalog section in Managing Your Store, but for now, we will run through the process in very basic form, just to get you started. From your Admin, click on Product Catalog. This will take you to the main Categories/Products page:

Because your store came configured as a CRE Loaded store, there are already categories and products set up.
Click on "Gift Certificate" (if it is not already highlighted), and you will see the Gift Certificate info box in the right column. You’ll see buttons for "Edit," "Delete," and "Move," and a picture of the gift certificate.
The "Delete" button will delete the entire category. For instance, the store comes with a category for "Software" pre-installed -- if your store doesn't sell software, you can delete the entire category and all the products in that category all at once. However, you may want to create your own Catalog before deleting the pre-existing Categories and Products -- you can use them as a reference guide in case you don't understand any part of the set-up process: just look at an existing item through the Admin, then find it in your "View Catalog" to see how that item appears.
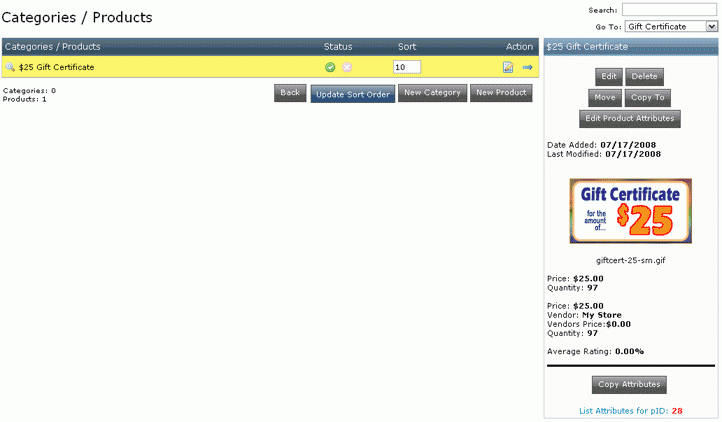
Click on the "Gift Certificate" folder, and you’ll see this screen:

Notice that the "Status" column has a green check mark in it. This means that the product -- the $25 Gift Certificate -- is an Active product. If you view your catalog now and look under Gift Certificates, you will see the $25 Gift Certificate listed. Click on the red X in the "Status" column, then view your catalog -- the gift certificate is no longer displayed. However, it is still in your database -- just click the green check mark to put it back into your catalog. This makes it easy to manage your catalog without having to constantly delete and add products as they go in and out of inventory. When you add a new product, it is automatically set as Active.
Now click on "Categories/Products" under Catalog in the left-hand column, and you're back to where we started.
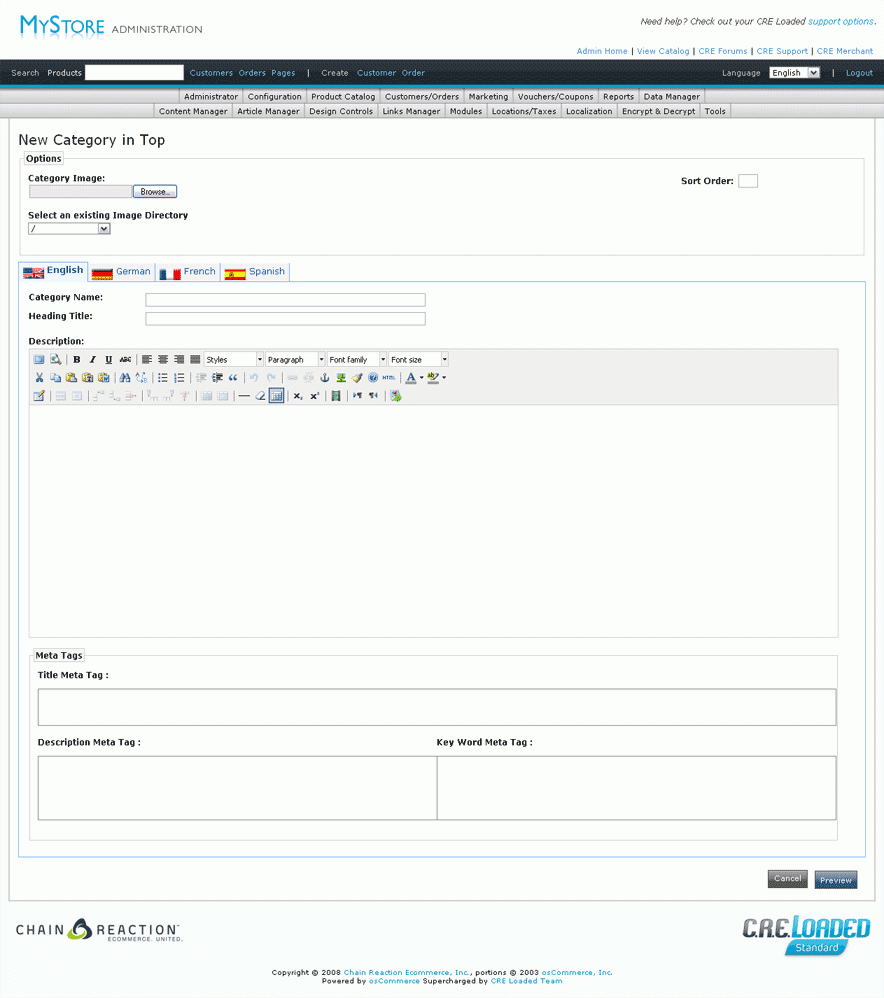
To add a category, just click "New Category." That will take you to:

If you want a picture for the whole category (not for the individual products), add it under Category Image.
Unless you are specifically creating stores for other languages, don’t worry about the flags; just make sure you are working in the "English" tab.
Category Name should be a short description of the category, since it will be used in the left-hand navigation column of your store.
Heading Title will appear above the products in the middle column of your store, so it can be more detailed. For instance, the category name might be "Parts," and the heading title might be "Parts for Giant Robots" -- or it could just be "Parts."
Under Description you can add even more detail. For instance, "Here you will find everything you need to build or repair your fleet of Giant Robots." Or you could just write "Parts" again. Or nothing at all. It's up to you. You can format the text however you want with the tools on the edit bar, just like in a word processor.
If you know what Meta Tags are, you can add all of that on this page. If you don't know what they are, don't worry about it just yet. Complete information about working with Meta Tags is available in Adding Products of Creating Your Catalog.
When you are done, click "Preview." You’ll see a screen with four flags on it; your category information will be by the English flag. The other flags will be blank, unless you specifically created entries for those languages.
If everything looks okay, click "Update." You'll be back at the Categories/Products screen, and now you should see your new category in the list.
Click on the folder for your new category. It will look like all of your categories have disappeared, but if you look at the Go To: box in the upper right corner of your screen, you’ll see the name of your category listed. That means you are working in that category -- and since you haven't added products to it yet, it is blank. Any products or sub-categories you add here will be listed under this category.
To add a product, click "New Product," and a very long screen appears.
Make sure to mark the product Status as "In Stock" and add the number you have in stock to Quantity -- the quantity will be automatically reduced as products are sold, and if it ever drops to zero, the product will automatically be listed as "Out of Stock." Add today's date for Date Available -- if you add a date in the future, the product will not appear in your store until then. Also add the Weight if you want your store to automatically figure shipping costs.
Under Tax Class, mark the product as "Taxable Goods" if you are required to charge sales tax. Once you add the Net Price, the price including tax will automatically appear in the Gross Price field.
Now (with the English tab selected) add the product's Name, Blurb (a short description that will appear on the category page), and longer Description (which appears on the individual product page). If you want to add a link to an external web page, such as a manufacturer's page, enter the URL.
If you want to display pictures of the product, add them in Product Images.
Unless you already know exactly how you want your store to look, don't worry about Additional Images or Extra Fields. You can always go back and add more information later, but for now, we want to get your store open for business as quickly as possible.
So once you have the product listing the way you want it, click "Preview," double-check the listing, and click "Insert" (or "Update" if you are editing an existing product).
And that's all there is to it! Now you just have to add all of your categories and all of your products the same way. Be sure to create categories first -- otherwise, you’ll have nowhere to put your products!
(If you have a huge inventory and want to save time, CRE Loaded includes a feature called "Easy Populate" that can automate your catalog set-up. It's a little complicated to use, but if you're interested right now, see Creating Your Catalog, Section 3 Easy Populate for more information.)
When all of your categories and products are entered, you are done! There is plenty more you can do to make your site snazzier, easier for your customers to use, easier for you to manage, but now you can take your time figuring out all of that -- your store is officially open for business and ready for customers! Good luck!

