- Home / Pages / CDS / CDS Manual - Section IV
Information
Articles
CDS Manual - Section IV
NOTE: You can follow along with this documentation at our online DEMO of Content Director at: http://demos.creloaded.com/crecds/
Content Director gives you the ability to leverage product catalog data and build a more cohesive browsing experience through several special features unique to Content Director. We will also cover the CDS-specific data backup tool at the end of this chapter.
Special Features Outline:
- Categories
- URL Overrides
- Title Images
- Header Banner Images
- Nested and Flat View
- Column Settings
- Showing Links
- Pages
- Auxiliary Content Files
- Attaching a product
- Showing Links
4.1 Category Special Features
- URL Overrides
A URL Override allows you to set an alternate URL for a category, thus linking to any existing page in the store or even an external link on another site. Anywhere this category appears the Url Override will appear, effectively allowing you to use the pages menu to link to all your product and all other content in your site.- In the Menu
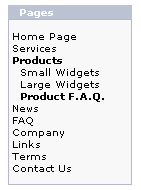
Here you can see the Pages Menu in the catalog next to the Admin controls for comparison.

- Only categories can have URL Overrides, not pages.
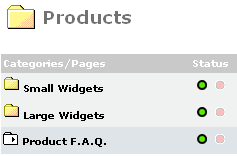
- When a category has a URL Override, its folder icon is replaced with the URL Override icon
 in the Admin list.
 - With a little work, you can have one infobox display all your primary navigational links on your site. This is a major departure from traditional multiple infoboxes, which containing separate lists of links to separate content modules.
- Creating a URL Override
The URL Override value for the FAQ is faq.php?cID=1
Below you can see the part of the category edit page where you set the URL Override value. Always check "append CDpath" when it is an internal link. This will activate the menu visual cues and the other special features to appear on the target page.
- The resulting URL in the browser is:
faq.php?cID=1&CDpath=2_14 - CDS automatically added the correct CDpath (which is the Content Director category Path) to the URL for you.
- The resulting URL in the browser is:
- Caution inside the category
Because it is a category, you can still click on it and make items in the category. To let you know you are in a category with a URL Override, we display the icon again and the URL value. Because of the override, customers will not be able to see inside the category contents.
- Catalog side-effect
Note that the link to Product FAQ; FAQ is not a page or a page category. It exists here in the menu because of URL Override. As you can see, we are showing the FAQ page, but it appears as part of the CDS content. The effect is due in part to several special features working together, Category Heading Banners, and Navigation bar appear on any page in the store now thanks to new RCI's in patch 11.
- CDS Page Category Menu item with URL Override
- CDS Products Category Header Banner
- faq.php page content
- CDS Navigation Bar
- In the Menu
- Title Image
You can add more graphic impact to your category listings with Category Title Images. Quite simply they replace the Category Title text with an image that you specify.- Before and After
Here is a category without a Heading Title Image. You see the title as normal text at the top of the category page.
Here is the same category with a Heading Title Image assigned to it. You can see the image where the word "Services" used to appear.
- NOTE: It is highly recommended that the image you use to replace the title has the words of the title as part of it is graphics.
- Before and After
- Header Banner Images
These images appear not on the category, but on all the children of a category.- In the Service category (image above), which has three pages in it:
- Installation
- Delivery
- Consulting
- Above all the pages in the services category you see the same image. This is the Heading Banner Image assigned at the Services category level.

- In the Service category (image above), which has three pages in it:
- Nested and Flat View
Creating lots of categories is great for keeping your content well organized, but the more sub-categories you have, the more clicks your customers must go through to get to them. That's why we introduced Flat view into Content Director category settings.
- Flat view flattens the presentation by 1 sub-category depth
- In flat view, you can see all the sub-categories and their children on the same page.
- Example:
In the Admin you see that "Team" has only two sub-categories directly in it:
- However, in the catalog you see the two sub-categories and their contents all on the same page.

- Example:
- Column Settings
Content Director allows you to set different column settings for the items listed on each category you make, accommodating the different amounts of data and presentation styles that various categories require.
- Choices for this setting are:
- 1 Column with description on left
- 1 Column
- 2 Columns
- 3 Columns
- Examples:

- Choices for this setting are:
- Showing Links
When you create a Page or a Category, you can set that item to appear in either the Infobox menu or the Listings.- Page and Category Edit Display Option:

- Item listing manager settings:

As you can see, you can set Menu and Listing on/off in either direct edit or when viewing a list of items in the Admin.
- Page and Category Edit Display Option:
4.2 Pages Special Features
- Attaching a product
Any page in the system can have a product attached to it. Once a product is attached to a page, it will display in the upper right of that page for immediate purchase. The page will also be automatically related to that product in the CDS Related Pages lists viewable from the product info page.- Selecting a Product to attach

- In the Admin list of pages you will see the products model number that is attached to that page.

- Page with a Product Attached to it:

When you click on the product from this page, you can either go to the product info page or add the product directly to the cart.
Here's the breakdown of what you can click and what happens:- Product image: Takes you to product info page
- Product Name: Takes you to product info page
- Buy Text: Adds product to cart
- Price: Adds product to cart
- Product showing Related page listed at bottom of page:

When you click on the product image or product name you come to the product info page with the Content Director special features enabled. One of the special features is the Related Pages list that appears at the bottom of the product info page. The list will show all the pages that have this product attached.- CDS Infobox Menu indicator
- CDS Header Banner Image Displayed
- Actual Product Info content
- CDS Related Pages lists
- CDS Navigation Bar
- Selecting a Product to attach
- Auxiliary Content File (ACF)
Each page created is assigned an ACF. This file, once it is created, will be included directly below the page Body content.- Example of Page with ACF content:

- Page Body content
- ACF content
- Admin Page Edit
- If the ACF has not been created OR if you have named it incorrectly, you will see this message:

NOTE: You do not need to have an ACF to make a page in Content Director. ACF is completely optional. - Once you upload the file in the correct folder with the correct name you will see this:

- The link presented allows you to preview the ACF content. You cannot edit the ACF from the Admin, only via FTP.

- You can also preview the source code of the ACF file by clicking the View Source Link in the pop up.

- If the ACF has not been created OR if you have named it incorrectly, you will see this message:
- Example of Page with ACF content:
- Showing Links
This is the same for pages as it is for categories. See Section 4.2 part 5 above.
4.3 CDS Database Backup Tool
- CDS Backup tool
Each CRE Add-on System that CRE Loaded publishes comes with it is own independent Database backup and restore tool.
- This Backup tool only exports data from the Page Manager system
- Page Categories data
- Pages data
- Page to Category Relationships
- CDS Configuration Data
- Backup tool Example:

- Backup Tool - making a new backup:
To make a new Backup, click the button "backup" on the lower right area of the page.
- Close-up of New Backup options:

NOTE: It is best to choose GZIP or ZIP compression to save space. - Choose "Download Only" if you do not want to store a copy on your server.
- Close-up of New Backup options:
- Backup Success
Once the backup is complete, you will see a green success message and you will see the backup listed on the backup page. - Restore a Backup
To resore a backup select one in the list and then choose Restore.
- This Backup tool only exports data from the Page Manager system
This concludes the Content Director Documentation. We hope you found it helpful. Check www.creloaded.com for online documentation for this and other CRE Loaded Products.
Information
Articles

