Creating Your Catalog - Section I: Categories and General Preparation
CRE Loaded organizes your products into categories to enhance your customers' shopping experience. If you did not already do so in the Quick Start Guide, you should make a list of all your products now and sort them into general categories.
Your CRE Loaded store comes with default categories and products already set up. You can use these as reference for setting up your own store, but be sure to delete the defaults when you no longer need them -- as long as they are in your store, they are part of your catalog and can be seen by your customers!
1.1 Creating Product Categories
In your Admin, click on Catalog to go to the main Categories/Products page. Click on "New Category" and you will see this screen:
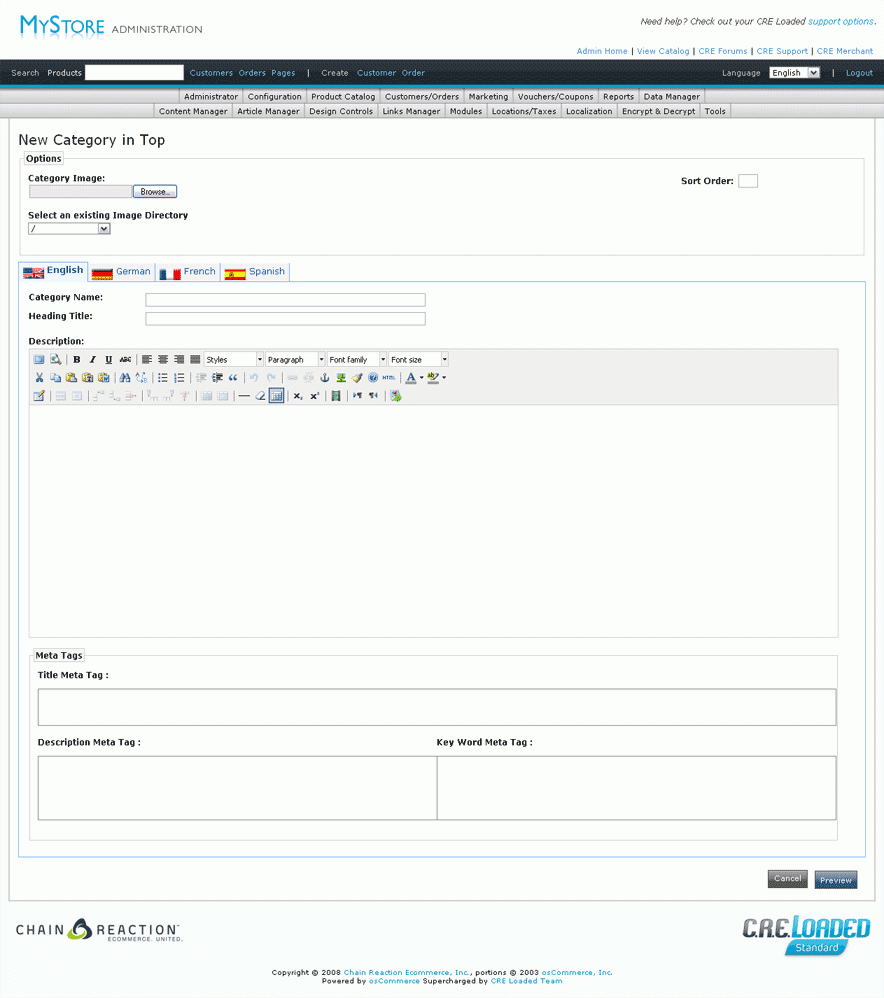
Category Image: If you want to include a picture for the whole category, upload it here.
Sort Order: Categories will be listed in ascending order. If two or more categories have the same sort order, they will be displayed in order from newest to oldest. If you leave this field blank, CRE Loaded automatically sets the sort order to 0.
Unless you are specifically creating multilingual stores, don't worry about the flags; just make sure you are working in the "English" tab. If you are creating multilingual stores, click on the different flags to enter your French, German, and Spanish text.
Category Name: This is the text that will appear in your category Infobox. It should be as short and concise a name as possible.
Category heading title: This is the category title that will appear above the products on your main store page when customers are shopping this category. It can be more detailed than the category name.
Category Description: If you want to add more detail about the category, you can add it here. If the category name and heading are self-explanatory, you can leave this field blank.
You do not need to enter Meta Tag information if you do not want to or if you don't understand it, but this information will help search engines match your products to searches, so we suggest you include it. For more on meta tags, see Customizing Your Store, Section 4.2 Advanced Customization.
Category Title Meta Tag should include 10-12 words that very specifically relate to the product.
Category Description Meta Tag should be one or two short sentences that search engines will display to describe the product.
Category Keyword Meta Tag can be up to 1,000 characters of keywords or phrases that you think your potential customers will search for. Be sure to enter the most important terms first.
If you are using the CRE Loaded Professional B2B version, you will see further options for customer groups. Please refer to Creating Your Catalog, Section 4.4 for complete information creating and managing customer groups.
1.2 Listing Product Options
Products options are any attributes that a customer can select. For instance, software runs under either Windows or Mac, and clothing comes in a variety of sizes and colors. CRE Loaded manages all product options and attributes from a single location: Admin => Catalog => Product Attributes.
1.2.1 Product Options
The first part of this page is Product Options:
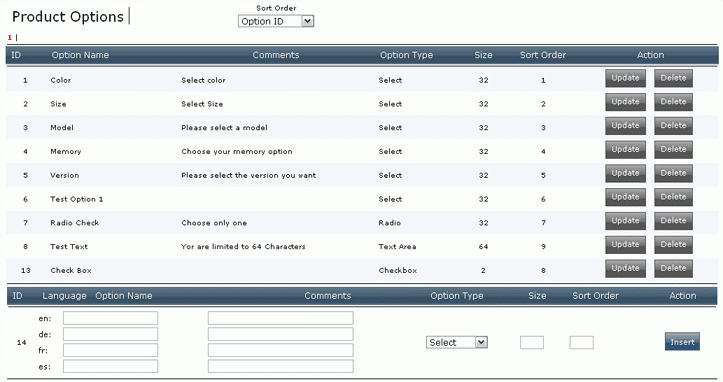
This is a list of every option you have specified for every product. Note that this field is just for setting up the type of option, such as "Color" -- the specific values for the option (e.g., green, brown, black) are set in the next field, Option Values.
In Product Options you specify the Option Name and a description (Comments) of the option. You do not need to include a description if the option name is self-explanatory.
Option Type lets you control the nature of the customers’ choices for the option:
-
Select provides a drop-down menu box (like the Option Type menu itself) from which customers can select one choice. This is good for exclusive options like size or color: a shirt can be small or medium, but not both.
-
Text lets your customers add write in whatever they want -- for instance, if they can customize a product by adding their name or a short inscription.
-
Radio buttons are circles beside option names that let customers choose just one option. Like Select, this is used for exclusive options.
-
Checkboxes are squares beside option names, but unlike radio buttons, customers can choose as many checkboxes as they want. Checkboxes are useful for products that can be upgraded with multiple add-ons, such as a bicycle where customers can add such features as fenders, streamers, a bell, a basket, etc.
-
Text Area provides a large window where customers can add a lot of text, such as a question or special packaging instructions.
Size is not the size of the product but the width in characters of the option box. In addition to controlling the look of your site, you can use this feature to limit the amount of text a customer can enter for an inscription or other custom printing on an item.
Sort Order determines the order in which the options will be displayed.
The top portion of this field lets you edit existing options; the lower portion lets you create new options.
1.2.2 Option Values
The second part of this page, Option Values, is where you enter the values for each option:
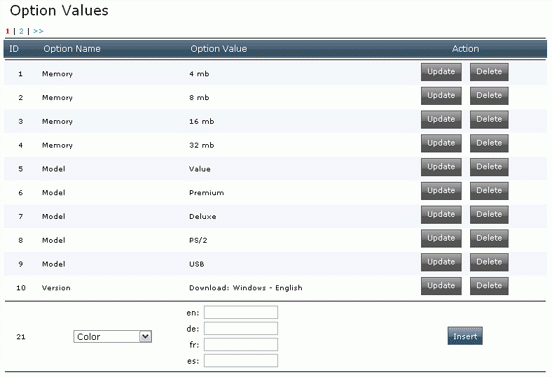
Choose the option from the Option Name drop-down menu, then enter the value under Option Value. Be sure to enter your text in the box for the correct language.
1.2.3 Product Attritbutes
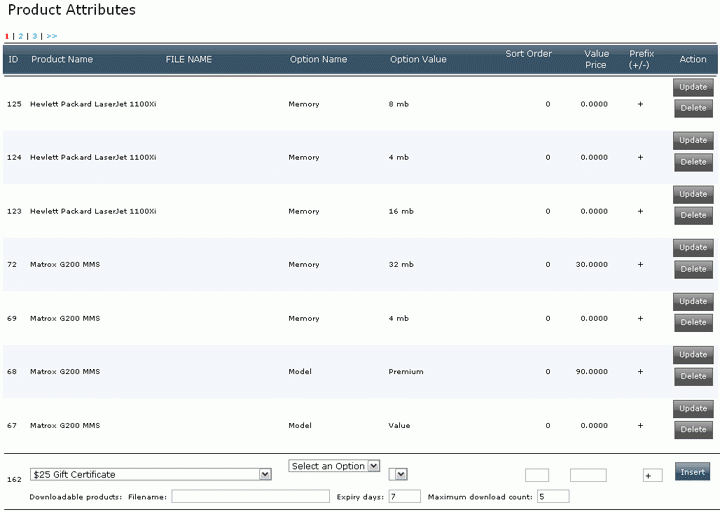
The third field is Product Attributes. If you do not set your product attributes for each product individually as you create it (see Creating Your Catalog, Section 2.6), you can set them all here. If you have not added a product, you will have to do that before you can select its attributes from this field.
-
Select the product from the Product Name drop-down menu, then select the option you wish to set from the Option Name drop-down menu.
-
The Option Values for that option will be displayed in the drop-down menu. If you have not set the option values for an option, the only value available will be "Textual Option." You must set the option values before you can select that option as an attribute for a product.
-
As before, Sort Order determines the order in which the options display on the product page.
-
If an option adds to or subtracts from the default price for a product (for instance, if an XL shirt is $5.00 more), set the amount with Value Price and Prefix (+/-).
-
If a product is available by download (for instance, an MP3 or an eBook), you can set the parameters here. Enter the Filename, the Expiry days (how long the customer has to retrieve their download after purchase), and the Maximum download count (the number of times the customer can download the file for that price) in the appropriate fields.
If you have the CRE Loaded Professional or Professional B2B version, see Creating Your Catalog, Section 4.2 for information on using Sub-Products, a more powerful way to manage product options and control inventory management.
1.3 Listing Manufacturers
If you resell products, you can include information about the manufacturers so that your customers can search for all products by a manufacturer or to provide a link to the manufacturer's web page for that product.
Because you will link to this information when you are adding your products, it is easier to enter this information first. However, if you decide to add manufacturer information later, you can always edit your product pages
To add a manufacturer, go to Admin => Catalog => Manufacturers and click "Insert," then enter the Manufacturer's Name, upload a logo or other Image if you wish, and add the URL for the web page you want to link to.
Be sure to delete any of default manufacturers included as samples whose products you do not carry.
1.4 Product Listing Configuration
In the steps above you determined how the individual product pages will appear. To control how your catalog will display your product listings in the category pages, go to Admin => Configuration => Product Listing:
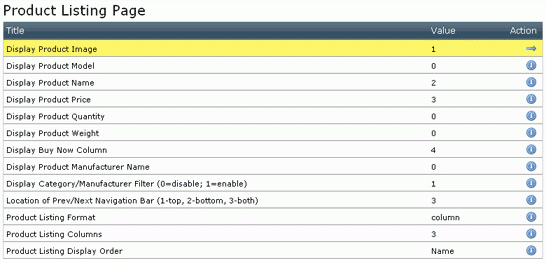
The values you enter for the first eight fields -- Display Product Image through Display Product Manufacturer Name -- determine the order in which this information will appear on the category page. A value of 0 will prevent the information from appearing. In the example screen above, the category will display (for each product) the product's image first, then the product's name, and then the product's price.
Display Category/Manufacturer Filter: If this value is set to "1," Catalog pages displaying Products by more than one manufacturer will display a drop-down menu allowing your customers to search for Products by a specific manufacturer. Set this value to "0" to disable this feature.
Product Listing Format: If set to "column," the information that you choose to display will display in a column (for example, with the product image on top, the product name below it, and the price below that); if set to "row," the products will display in rows (for example, with the product image on the left, the product name in the center, and the price on the left).
Location of Prev/Next Navigation Bar does exactly what it says: if you have more than one page of products in a category, set this value to "1" to display the "Previous" and "Next" navigation bar at the top of the catalog page, set it to "2" to display the navigation bar at the bottom of the catalog page, and set it to "3" to display the bar at both the top and the bottom of the page.
Product Listing Columns controls how many products will appear in each row of your catalog. Note that this setting may seem confusing -- because it controls the number of columns of products that will be displayed, it affects how many products appear in each row of your catalog. For example, if you display 3 columns of products, there will be 3 products (columns) in each row.
Product Listing Display Order: Select whether you want products displayed in order according to name, model number, price, manufacturer, quantity, weight, sort order, or when they were added to your catalog. (Note: CRE Loaded 6.2 includes this setting in the Configuration =>My Store menu; not all of the order options are available in CRE Loaded 6.2.)

