Creating Your Catalog - Section II: Adding Products
Now that everything else is set up, it is time to start adding products to your catalog.
If you have a lot of products, it may save time to use CRE Loaded's Easy Populate feature, which lets you upload a whole database of products at once, instead of entering each product individually. See Section 3 for more details on Easy Populate.
To enter products one at a time, Go to Admin => Catalog => Categories/Products and select the category in which you wish to list the product. Clicking on "New Product" will bring you to a very long menu with six separate fields.
Remember that the built-in security feature will automatically log you out of your Admin every 15 minutes (CRE Loaded 6.3 users can change this setting in Admin => Configuration => Sessions =>Session Lifetime), so be sure to save your work periodically as you enter each Product!
2.1 Product General Information
The first field lists general inventory information about the product.

Status must be set to "In Stock" in order for the Product to display in your catalog. If you wish to remove an item temporarily from your catalog for any reason, setting it to "Out of Stock" is an easy way to do so without deleting the item and having to re-enter all of the information.
Quantity, when used in conjunction with the Configuration => Stock module, lets you track your inventory on hand. The Stock module lets you display the quantity on hand to customers, will automatically reduce quantity in inventory each time an order is placed, will list a product as "Out of Stock" if the quantity reaches 0, and will notify you when stock on-hand drops to a certain level.
If Date Available is set to a future date, the product will not appear in your catalog until that date.
Model lets you add a model name or number for your reference so you can track your products in inventory or accounting.
If you entered Manufacturers in Section 1.3, Manufacturer lets you select and display this information in your catalog. This option will not be available if you have not already entered at least one manufacturer.
Weight is the shipping weight of the product. Enter only decimal numbers -- i.e., 1.25. Note that you do not enter whether the weight is pounds or kilos here -- that is controlled by the Shipping Module you use. Just be consistent -- if you will calculate shipping charges based on the weight in pounds, be sure that you enter the weight of every product in pounds.
You must have product weights assigned to products in order to use Shipping Modules. If there is no weight, CRE Loaded assumes the products are downloads, and will only assign “Free Shipping” to the order.
Tax Class lets you set whether a product is taxable or tax-free. To use this feature, you must set up Tax Classes (see Order Processing and Management, Section I).
Net Price is the retail price to display in your catalog. If a product is taxable, CRE Loaded automatically figures the retail price including tax and enters this amount as the Gross Price.
2.2 Product Name and Description
In the next field, you will enter the Name and Description of your product, along with the URL link to an external webpage (such as the manufacturer's page for the product) if you want. The product name should be short and concise, but you can make the description as extensive as you want.
If your store is set up to display your catalog in multiple languages, you can enter names and descriptions in each language by clicking on the flag tabs at the top of this field.
2.3 Meta Tag Information
You do not need to enter Meta Tag Information if you do not want to or if you don't understand it, but this information will help search engines match your products to searches, so we suggest you include it. For more on meta tags, see Customizing Your Store, Section 4.2.
Page Title meta tags should include 10-12 words that very specifically relate to the product.
Meta Description should be one or two short sentences that search engines will display to describe the product.
Meta Key Words can be up to 1,000 characters of keywords or phrases that you think your potential customers will search for. Be sure to enter the most important terms first.
2.4 Product Images
CRE Loaded makes it very easy to manage product images -- simply browse for them just as would when attaching a picture to an email.
CRE Loaded uses three general sizes for photos. You can make any photo any size you want, but it is best to keep them close to the sizes listed below. And your store will generally look better if you keep the sizes consistent -- all small images the same size, all product images the same size, etc. You will need a graphics program such as Photoshop to edit and resize product photos.
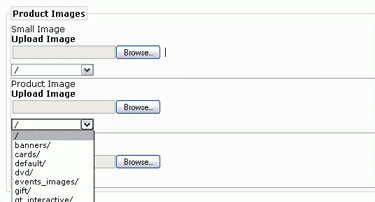
Small Image is the small "thumbnail" image that will appear in the category listing of your catalog. These should be about 100 x 100 pixels.
Product Image is the featured picture that appears on the product page itself. 250 x 250 or 300 x 300 pixels is a good size for product images.
Pop-Up Image is a larger picture that will open in a new window to give your customers a better look at the product. It is usually a larger version of the product image. 400 x 600 pixels works well for pop-ups.
To add each of these product images, simply type the file location into the box or click on the appropriate "Browse" button and search for the image file on your hard drive in the "File Upload" window, then select the file and click "Open." Be sure to upload the correct image to each field -- the small image to the small image field, etc.
By default, all images are uploaded to your store's Images/ directory. Below each "Upload Image" field is a smaller drop-down field that lets you select a subdirectory within Images/ to which to upload the images.
CRE Loaded 6.3 Professional and Professional B2B offer separate menus for uploading new images and for choosing images already on your store server. Select the "New File" tab to upload new images following the procedure described above. To choose an image that you ahve already upload to your server, select the "Existing File" tab, select the directory from the "Image Dir" drop-down menu, then choose the image from the "Image File" drop-down menu.
2.5 Additional Images
CRE Loaded lets you add up to six additional small images and six additional pop-up images (called "XL Images" in this menu) to each product page. You can use these to show different views of a product, the various colors in which a product is available, or whatever you want.
Note that the additional small images will display on the product page, underneath the product description. When customers click on one of these additional small images (e.g., SM Image 1), the associated pop-up image (e.g., XL Image 1) will appear.
You add these additional images the same way you added the main product images.
2.6 Attributes
If you created product attributes in Section 1.2, you will see a list of every attribute, organized by option. If you are using CRE Loaded Standard, the complete list of attributes and options will appear at the bottom of the "New Product" page.
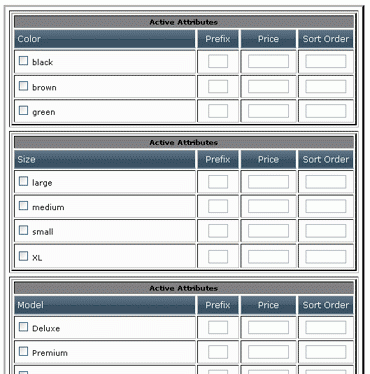
For each product, click the box beside each option that you want displayed for that product.
If you are using CRE Loaded Professional or Professional B2B, click the "Edit Product Attributes" button at the bottom of the "New Product" page to see the list of attributes.
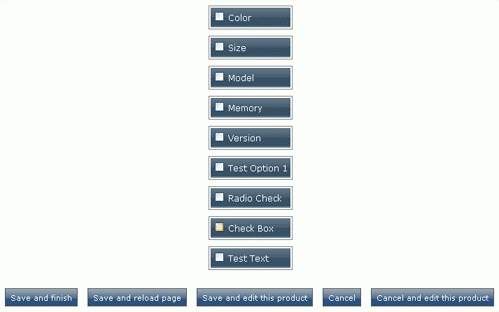
To add an attribute to your product, select the attribute and click "Save and Reload Page." The list of option values for that attribute will now be available.
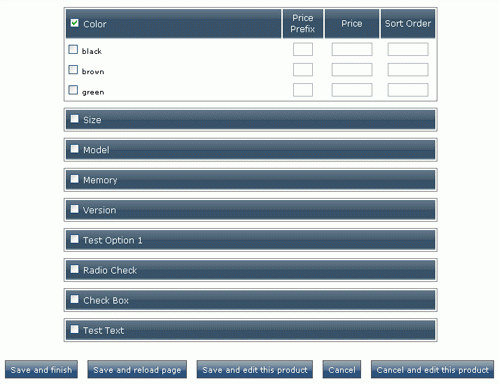
If an option adds or subtracts from the standard price, add that information. In the Prefix box, put a "+" if the price will be increased or a "-" if the price will be decreased, then under Price enter the amount by which the price is changed, not the total price -- CRE Loaded will automatically figure the total price for you. The example below shows Color options in radio buttons and Size options in a select drop-down, both with price adjustments:
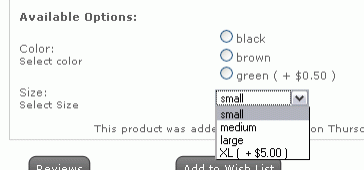
Sort Order controls the order in which the option values will appear. The option values are listed in this menu alphabetically -- note that in the Active Attributes menus above the values for Color and Size are listed in the order large, medium, small. If you want them to list on your website in the order small, medium, large, set the sort order for small to "1," the sort order for medium to "2," and the sort order for large to "3." If you want to change the order in which the attributes themselves are listed (for instance, if you want Size to appear above Color in your store), you must set that in Admin => Catalog => Product Attributes (see Section 1.2).
When have finished creating your product, click "Insert" to add the product right away. If you want to double-check your work and see how the product listing will look in your catalog, click "Preview" -- this will show you the product listing in every language you have selected for your store. If you are satisfied with the product listing, click "Insert"; if you want to make changes to the listing, click "Back."
This completes the product listing for one product. Now repeat the process for every product you wish to add to your catalog. You can see that if have many products, this can be a tedious and time-consuming process. This is where the Easy Populate module can help. See Section 3.1 for more information on this time-saving feature.
2.7 Download Controller
CRE Loaded makes it easy to sell or distribute downloadable files such as software, music, videos, or eBooks. The Download Controller lets you manage downloadable files, control access to them, and determine the methods by which customers can retrieve their files.
In order to allow downloadable files in your CRE Loaded store, go to Admin => Configuration => Download.
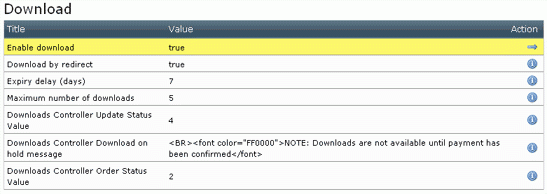
Set Enable download to "True."
Download by redirect will redirect your customer’s browser from your store's download directory to a different directory. This must be set to false for non-Unix-based systems. If you are not sure about this setting, make sure all of your downloadable files are kept in your store's /download directory and set this value to "false."
Expiry delay determines how long after purchase a customer can wait to download the product before the download link for the order expires.
Maximum number of downloads controls how many times a customer can download the file he or she has ordered. We recommend that this value be set to "2" to give a customer a second chance to download the product if there is a problem with their first attempt.
Update Status Value is the Order Status Value that will cause Expiry delay and Maximum number of downloads to be reset. The default value is "4."
Download on hold message is the message that will be displayed for a customer when a download is on hold pending payment confirmation. Note that you can add html codes to format your message, although they will not be applied here in your Admin.
Order Status Value: the default value is "2" -- "processing."
Once you have set the values for Download Configuration, add the Products to your store if you have not already done so. You add downloadable Products just like you do any others. However, make sure that the Product Weight is "0."
Create a Product Option (Section 1.2) such as "Version," and create the appropriate Option Values.
In the Product Attributes menu there is a section for downloadable products. You can set an Expiry Delay and Maximum Download Count for each product individually if you want. If you do not set a value here, the default values you specified above in the Configuration menu will be used.

In the "Filename:" box, type the EXACT name of the file that will be downloaded. Double-check what you type here, because if the filename is not an EXACT match, the download will not work.
If you have not already done so, upload the file to your store's /download directory.
You must now set permissions on your /download and /pub directories. To set the permissions, enter your website ftp address in your FTP client. Go to the /download directory, double click the folder "Includes," then right click on the file named "configure.php." Select "Properties" from the drop-down menu and change the value listed for permissions to 0755. Click "Apply" and "OK." Follow the same procedure to set Permissions of your /pub directory to 0777.
We recommend that you make a few test purchases to make sure that everything is working properly. (Temporarily set the price of one of your downloadable products to 0 so that you don't have to pay for your own product -- but remember to restore the price when you are done!)
2.8 Products Expected
In Chapter 8.1 you saw how to add products with a Date Available in the future so that they will automatically appear in your catalog on that date. This is very convenient, because you don't have to worry about logging into your Admin and adding the products on the actual date they become available.
Products Expected makes managing these products even more convenient -- you can view all future products on one screen and edit them on case their dates of availability change.
You can view all Products Expected in Admin => Catalog => Products Expected.
To edit a product -- for instance, if it becomes available sooner than expected, highlight the product and click "Edit." This will take you to the "New Product" screen, where you can edit all of the product information.
2.9 Multiple Products Manager
The Multiple Products Manager lets you move, copy, or delete many products at once -- even an entire category. (Note: Multiple Products Manager is not available in CRE Loaded 6.2 Standard.)
 |
Multiple Products Manager alters several tables in your database (see the on-screen notice for more information), so we highly recommend that you backup your database before proceeding. |
To use the Multiple Products Manager, go to Admin => Catalog => Multi Products Manager.
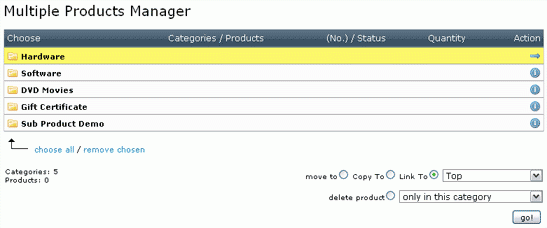
Note that you can only select products, not entire categories.
Once you select the products, you can move or copy them to another category. "Move to" will add the products to the category you choose and remove them from the current category; "Copy to" will add them to the new category and leave them in the current category as well. Note that the products are not duplicated in your database, but only linked to the new category.
You can also choose to delete products. Selecting delete "only in this category" will remove the links to the products from the current category but will leave them in your database. This is useful if you will not stock the products for a while (seasonally, for instance, or due to lack of availability), but expect to have them in stock again in the future. If you select "delete the complete product," the products will be completely removed from your database.

