Creating Your Catalog - Section III: Using Easy Populate
3.1 Introduction to Easy Populate
If you have a lot of products in your store, creating individual listings for each one can be very tedious and time-consuming. Fortunately, the Easy Populate feature lets you add or edit all of your products at once in a single batch. You will still have to enter all of your data, but you can do it all in one place, without worrying about the security time-out of your Admin. You will need Excel or a similar spreadsheet program.
There are two Easy Populate modules: Basic and Advanced. The differences between the modules lie primarily in the ways you can export the data. Easy Populate Basic allows you to export your complete products database; model and category data only; or model, price, and quantity data, and lets you either download the datafile to your computer or store it as a temporary file on your website’s server. Easy Populate Advanced also lets you sort the data and lets you export only certain categories, manufacturers, or product ID number. Complete help is available in your Admin => Data Manager screen.
 |
Warning: Before using Easy Populate, you must backup your database! You will be drastically altering your database with Easy Populate, and if something goes wrong, you could potentially lose your entire Catalog if you do not have a backup. |
3.2 Creating Your Database
The database file structure must be matched exactly. Rather than create your own database from scratch and try to match the structure, it is much easier to start with an existing database file. So the easiest way to begin is to first export your product database -- even if it is empty. This will give you the equivalent of a spreadsheet with all of the fields and titles already set up; you will only have to fill in your data, without worrying about the structure.
To begin, backup your database!
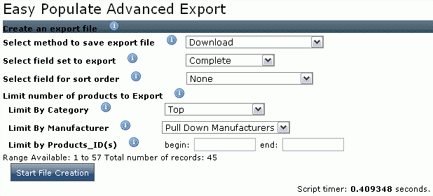
Next, go to Admin => Data Manager and select either "EPA Export" (Advanced) or "EPB Export" (Basic). If you use Easy Populate Advanced, you will see this screen:

Note that Easy Populate Basic will only include the first two options. If you have any questions about an option, click on the ![]() beside it for more information.
beside it for more information.
For now, since you are just trying to get the database structure, you can leave the default settings as they are (Select method: "Download" and Select field set: "Complete"; if you have chosen to use Easy Populate Advanced, leave all of the other settings at their default values as well). Click on "Start File Creation" and follow the prompts to save the file to your computer. If you are using Easy Populate Basic to export the file, its name will start with "EPB"; if you use Easy Populate Advanced, the filername will start with "EPA."
Once the file has been downloaded onto your computer, open it in Excel or a similar spreadsheet program. Do not modify or delete any of the column headings. If this is the first time you have used Easy Populate, test it by adding just one product to your catalog at this time and uploading it to your site. It is much better to find out you have made a mistake and learn how to correct it with a single product than to discover a problem after you have spent hours creating your entire database.
When adding product data, notice that you can specify filenames for product images here. Those images are not included in this database; you will have to upload them to your site separately, but you can use your FTP program to upload them all in a single batch to your /images directory. Entering the image filenames in your database will automatically associate the images with the products, but until the images are uploaded to your site, you will receive an error message in your catalog.
You can also remove products from your database using Easy Populate. In your spreadsheet, enter "delete" (without the quotation marks) in the v_action column for the products you want to delete. When you upload the database to your store, these products will automatically be deleted.
Each Product row must end with EOREOR. Make sure that every product you add has EOREOR in the last column.
When you have added all of the necessary Product information, save your database as a tab-delimited text file. Saving your database in any other format will cause your catalog to crash! If you used Easy Populate Basic to export the file, make sure the first three characters in the filename are "EPB"; if you used Easy Populate Advanced to export the file, make sure the first three characters in the filename are "EPA."
3.3 Uploading Your Database
To upload the new database to your site, go to Admin => Data Manager and select either EPA Import or EPB Import. Note that EPA import will only import files whose names start with "EPA," and EPB Import will only import files whose names start with "EPB."

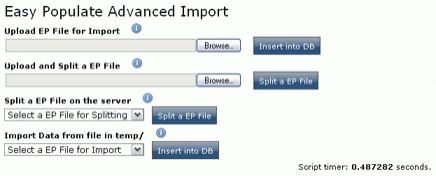
Enter the filename in the "Upload EP File for Import" box or click "Browse" to search for it. When you are ready, click "Insert into DB."
At the bottom of the screen you should see something similar to
File uploaded.
Temporary filename: /tmp/phpsBeQ35
User filename: EPA2008Aug03-1806.txt
Size: 3302
followed by a list of data.
Click the drop-down arrow in the "Import Data from file in temp/" menu and select your file, then click "Insert into DB".
Once the file has uploaded, go to your store and see if your new Product appears in your Catalog. (Remember that the images will not appear if you have not yet uploaded them.) If the new product is listed, you have done everything correctly, and can now continue building your complete products database in the same way.
In very rare cases -- if your catalog has thousands of products in it -- you may have to go through a few extra steps to upload your database. Because the programming language in which CRE Loaded is built limits file uploads to 2MB, you may have to split an extremely large database file into smaller parts or FTP it to your site and then import it. You also may choose to split your file or FTP it to your site if your Admin times out while you are trying to upload the file (CRE Loaded 6.3 users can change this setting in Admin => Configuration => Sessions =>Session Lifetime).
To split a file, type the filename or browse for it in the "Upload and Split an EP File" box, then click "Split File."
If you choose to FTP the file to your site instead, once you have finished the upload, select the file in the "Split an EP File on the server" box and click "Split File." Then select the split files in the "Import Data from File in temp/" and click "Insert into DB" to reassemble the split files into a single database.
Once you have finished creating your product database, upload all of your product images. You can use your FTP program to upload them all at once. Just make sure that you save them to your store's /images directory.
3.4 Using Easy Populate with Google Product Search
Google has a search engine specifically for shopping called "Google Product Search." It lets shoppers search only among products for sale, filtering out any unrelated or non-merchandising websites.
Merchants can upload their product information to Google Base (the Google database) either singly or in a batch. You can use CRE Loaded’s Easy Populate Module to automatically format and upload your complete product catalog in a single batch.
To use Google Product Search, you must first create a Google account at https://www.google.com/base/welcome. Once you are signed-in to your account, click the "Data Feed" link on the right side of the page, then select "sign up" under "FTP Uploading" on the right side of the next page. You can submit a data feed directly if it is less than 20MB (feeds over 20MB must be submitted via FTP), but using Google's FTP will make the process easier.
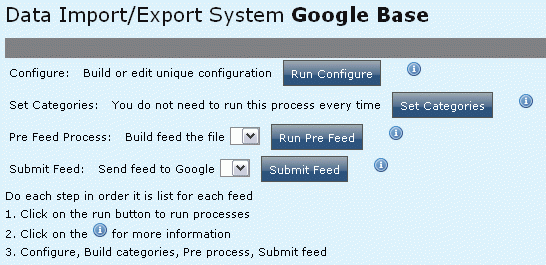
Once you have your Google Base FTP information, go to your store and select Admin => Data Manager => Google Base.

Now follow each step in order:
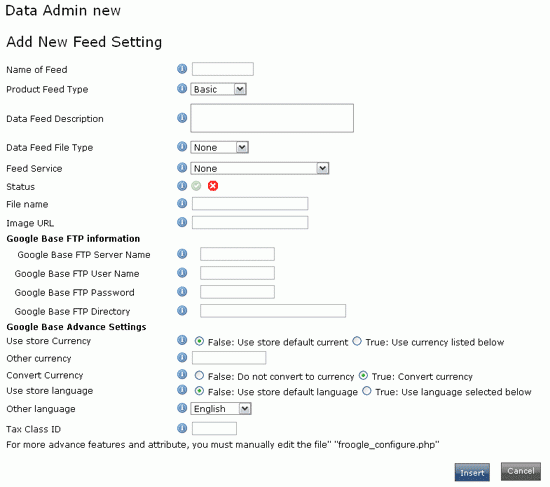
Click the "Run Configure" button. Click "New feed setting" and fill out the necessary information.

The Google Base FTP information will have been provided to you by Google when you signed up for FTP. In most cases, you will not need to worry about any of the Advanced settings. Click the information button beside any field for more information. You should be able to leave most settings at their default values. Be sure to click the green "Status" button to make the feed active. Click "Insert" when you are finished. This will return you to the main Google Base menu.
If this is your first feed, or if you have added new product categories since your last feed, click the "Set Categories" button, then click "Return" when the program finishes. If you have not modified your categories since the last time you created a feed, you can skip this step.
Now click the "Run Pre Feed" button to build the file. Click "Return" when the program finishes. It should finish quickly, unless you have an extremely large database of products. If the process seems to be taking a very long time, there may be a problem, in which case you will have to close the program and restart.
When all is ready, click "Submit Feed."
Be sure to sign in to your Google Base account to check that the feed was received and that there are no errors.

