Customizing Your Store - Section IV: Configuring the Page Contents
4.1 Changing the Title Text
The page title is the text that appears at the top of your browser window. For instance, if you click on "View Catalog" in your Admin, you will see that the default page title of your store is "CRE Loaded 6 - CRE Loaded 6.3 -" followed by the name of the browser you are using (Internet Explorer, Mozilla Firefox, etc.):

In this case, "CRE Loaded 6" is the title of your Index page (the page that users land on when they go to www.mystore.com) and "CRE Loaded 6.3" is the Default Title of your store. Every page in your store displays the Default (store) Title, but you can set specific page titles for every type of page -- products, links, account info, FAQ, etc.
You will want to change the store and page titles to reflect you own store, obviously. Generally, you should use your store name as the Default Title and a short description as the title if the index page. If you have a store called Kool Kollars that sells pet collars, you might want the Index Title to read "Dog and Cat Collars for Every Occasion" (and the Default Title to read "Kool Kollars," of course).
To edit the Title text, go to Admin => Design Controls => Edit Tags (Text Control if you are using CRE Loaded 6.2) and enter your text:

4.2 Setting Meta Tags
Note that for each category you can edit not only the Title but also Descriptions and Keywords.
Descriptions are one or two short sentences used by search engines to describe your store. If you type "CRE Loaded" into a search engine, the listing for www.getcre.com will read (at least in part) "CRE Loaded is a Commercial Open Source Ecommerce web application with File Distribution and Content Management Systems" -- the Default Description.
Keywords are the terms that customers might type into a search engine if they are looking for the types of products you offer. You can enter up to 1000 characters of keywords or phrases that you think your potential customers will search for. Be sure to enter the most important terms first.
Each category also has three or four checkboxes: Title Tag, Description Tag, Meta Key Tags, and (for some pages) Category Key Tags. It is best to leave these options on, to increase your visibility to search engines, and therefore to potential customers.
4.3 Customizing the Main Page
To set up your home page, go to Admin => Content Director => Define Mainpage (in CRE Loaded 6.2 the Define Mainpage menu is found under Content Manager).
Delete the default page contents and add your own. You can enter text, add graphics, and format everything using the wysiwyg editor.
4.4 Editing Personal Greetings
If you look at your Catalog, you will see that the default home page says, "Welcome Guest! Would you like to log yourself in? Or would you prefer to create an account?" You can personalize this greeting, as well as those for returning customers who have created accounts.
In your Admin, go to Tools => Language Editor and click on english.php. Search for and edit the following entries:

4.5 Selecting and Displaying Infoboxes
In Section 1.5 you chose whether or not to display the left and right columns. Now you will select which Infoboxes you want to display in those columns.
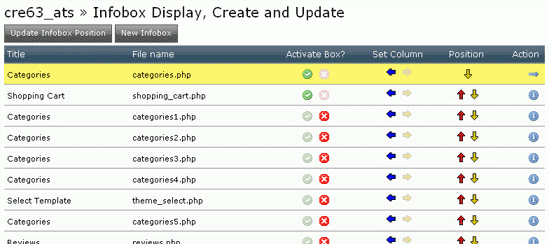
CRE Loaded provides you with more than three dozen Infoboxes to choose from. To access the complete list and the display options, go to Admin => Design Controls => Infobox Manager (or Infobox Configure in CRE Loaded 6.2):

This menu displays the title of each Infobox (which displays in the header box) and options to change the text color of the title, display or hide the Infobox, set whether it displays in the left or right column, and control the order in which the Infoboxes appear.
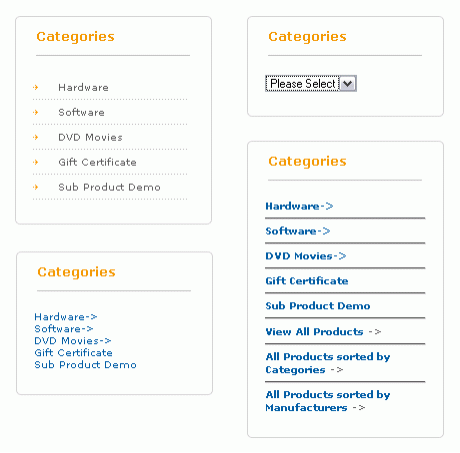
Note that there are several Infoboxes titled "Categories." If you activate a few of these and look at your store, you will see that each Infobox has a different format:

Take a look at them all, and pick whichever one you like best.
You can use this same trick to see the function of each Infobox and decide of you want to display it on your store -- activate an Infobox and click "View Catalog," and if you don't need or want that Infobox, simply deactivate it once again. For instance, if your store is only written in English, there is no need to display the "Languages" Infobox.
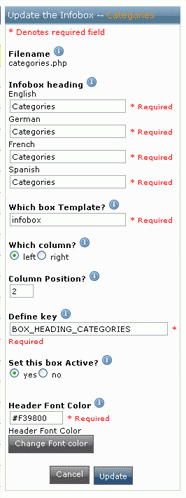
Clicking on a button under "Activate Box?," "Set Column," or "Position" will change that particular property; highlighting an Infobox and clicking "Edit" will bring you to the Update screen where you can change all of the Infobox's properties:

4.6 Changing Infobox Header Text
In addition to activating the Infobox and choosing its column and position, this menu lets you change the title of the Infobox ("Infobox heading") and pick the color of the title text. You can enter the name of a standard color (e.g., "red") or the HTML code for a color, or you can select "Change Font Color" to see a color palette which lets you simply pick the color swatch you want.
A reference chart of HTML color codes can be found at http://www.wdvl.com/Graphics/Colour/666.html, or you can search the Internet for "html color code."

