FDMS Manual - Section II
Overview of Program
a) The Customer Experience
The File Distribution System (FDMS) is an improved method of managing and controlling product downloads. This ensures that all customers who obtain access to the file have paid for it or otherwise fulfilled the terms of purchase/use. It is very easy for customers to download, so they are likely to make repeated product purchases.
FDMS Benefits to Customers:
From the customer’s viewpoint, it is much easier to purchase, download and manage their downloadable purchases.
 Ways for Customers to Download
The customer may choose to download any of the following ways:
- In the File Library Infobox by clicking the product name of the desired download, following the instructions to log in or create an account, and making a purchase
- Finding the product page and clicking the link at the bottom of that page
- Logging into their account and downloading from the My Account screen’s “My Downloads” page (if previously purchased or purchase not required)
- On the Checkout Success screen immediately after purchase
1. Download from the File Library InfoBox
| In the store, the customer sees the InfoBox entitled “File Library” which shows groupings of all files that can be purchased and downloaded. The groupings are by category, much like a product category. |
Clicking the Category Name brings up the File Library Category with a description and listing of the files under it, much like clicking a product category.
EXAMPLE:
In the above infobox, after the customer clicks the sample link entitled “Software Site” the customer sees this new File Library Category screen:
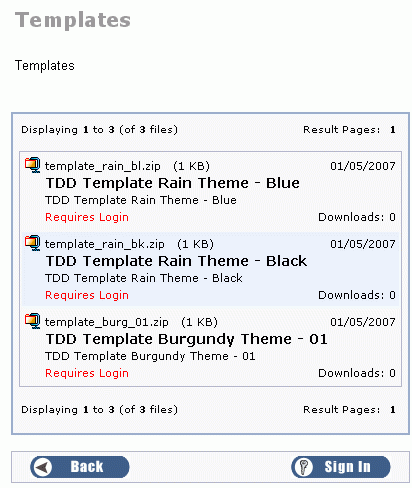
To download the first file in the list, the customer must log in and purchase the product.
When clicking an item in the “Action” Column above, a customer who has not logged in is brought to the Login page.
After logging in, the customer is brought back to the download page, as follows:
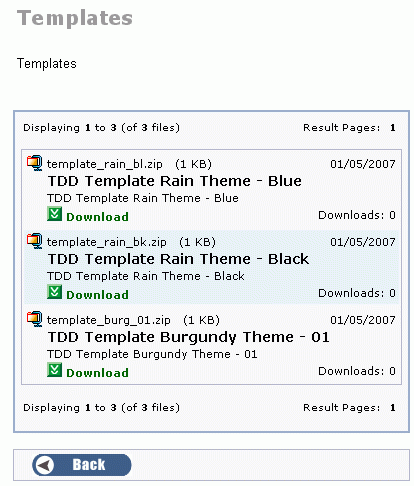
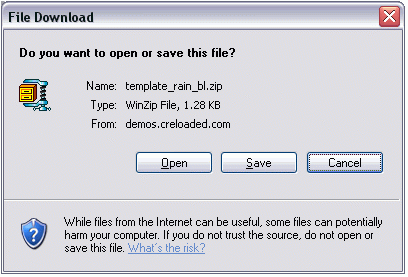
Upon clicking any of the “Download” links above, the customer sees the “File Download” Prompt to open or save this file. He or she should click the SAVE Button:
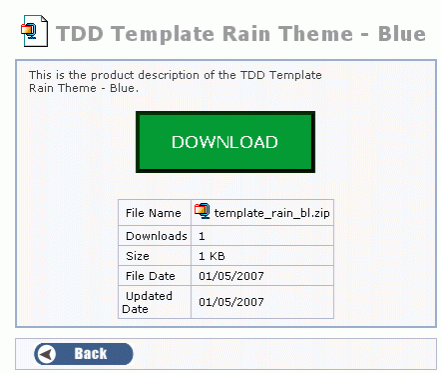
The customer can alternatively click the product name and go to the Product Information page to review and download:

2. Customer download by finding the product page and clicking the link at the bottom of that page
In this variation, the customer shops as usual, but on the catalog’s product page a “Related Files” box appears at the bottom:
3. Downloading from My Accounts
Customers may also download directly from the My Accounts screen by clicking My Account from the top navigation bar on any page of the catalog:

After logging into their account, Customers may also download or review their purchased downloads from their “My Accounts” summary screen, as follows:
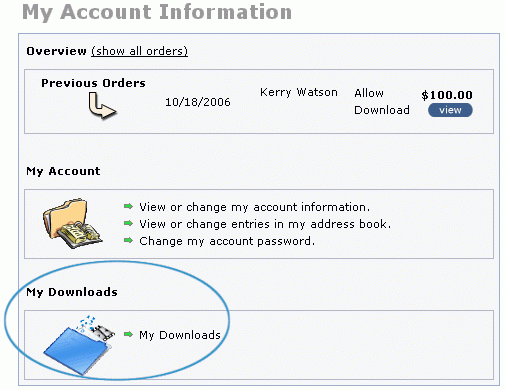
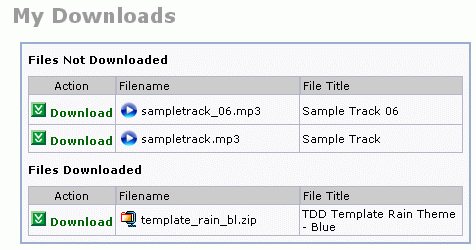
Clicking the “My Downloads” link in the My Accounts screen brings the customer to the My Downloads screen, as follows:
b) The Store Administrator's experience:
FDMS makes managing downloads in an online store easy. Most steps are consolidated into a single menu, the File Distribution Menu. Installation on an unmodified store is automatic, thanks to the Runtime Code Inclusion which extends the framework of the CRE Loaded application so that code can be safely added without hand-editing files.
Managing the FDMS involves using the following administrative menus:
- A NEW “File Distribution” menu for configuring, managing, and backing up the FDMS (see detail in next section)
- The Catalog – Categories/Products – Add a Product menu (to add downloadable products)
- Design Controls – Infobox Configure (to install and turn the Infobox on)
1. The New File Distribution Menu
Managing the FDMS begins with the new File Distribution Menu that appears after successful installation
: | File Library: Create folders and files of library items; move, edit or delete. New File Scan: Search the library for new downloadable files; add, edit, or delete descriptions of downloadable files; re-scan to add to file library. File Icons: Add new file icons; edit or delete the 16 file type icons included with the program. Featured Files: Allows FDMS downloadable files to be shown as featured files in your store. Reports: Five different downloads reports are available. These reports are "Top Downloads," "Attached Files," "Products w/ Attached Files," "Products w/ No Files," and "Download Log." Configuration: Make changes to the default configuration including the location of the download folder, what order status allows download, a table or detail view of downloadable files, specify icon sizes. FDMS Backup: Backs up or restores the downloadable files. |
| NOTE: This is an overview - see following Chapter 3 for detailed information on how to use each of the above menus. |
2. Catalog – Categories/Products – Add a Product menu to add downloadable products
Managing a downloadable product involves adding the product to the catalog the same as any other product, using the Admin’s Catalog – Categories/Products menu.
3. Design Controls – Infobox Configure – to turn the Infobox on
The last step in any program that includes a new infobox, including the FDMS’ File Library infobox, is to install and turn the infobox ON.
Installation Overview
Installation of the FDMS in an unmodified CRE Loaded 6.2+ store with Patch 9 is almost totally automatic, thanks to the new Runtime Code Inclusion (RCI) program which installs or uninstalls each component for you automatically. All you need to do to install to an unmodified store is to be sure the operating environment is adequate, back up, download the files, and then click Install.
Note that Patch 9 is the minimum requirement to run FDMS. We recommend that you check the CRE Loaded website regularly and always keep your CRE Loaded site updated to the most recent patch.
What is Runtime Code Inclusion (RCI)?
Runtime Code Inclusion (RCI) for CRE Loaded extends the framework of the CRE Loaded application so that code can be safely added to various places in the cart without hand-editing files. An RCI is simply a place on a page that runs code from files located in specific folders. CRE Loaded 6.2 Patch 09 introduced RCI to CRE Loaded base applications to allow for additional modifications and custom code, without ever worrying about the new additions overriding each other or a patch for the base application overwriting the modification's code. Multiple files from different modules can be added to a single folder location and their code will be displayed and run on a page in the application. Editing the file name suffix alters the order in which the modules appear.
 The FDMS Installation program will perform the following steps automatically for you:
- Creates the necessary new directories
- Uploads approx. 100 NEW php and image files with NEW filenames
- Replaces 3 files (1 stylesheet, 2 images)
- Edits 15 files
- Creates 8 NEW database tables, edits 2 existing database tables (configuration_group, configuration), and populates 1 newly-created database table (fdm_file_icons)
 Summary of Steps REQUIRED for Installation:
- Verify that your web-hosting environment meets the minimum requirements for the FDMS program.
- Verify that your store is not modified with ANY custom programming or changes since it was originally installed.
- Make a complete backup of your store and database. NOTE: We always recommend that you first do a test install on a copy of your store, NOT to your live store.
- Install and test any patches necessary so your store is current through at least Patch 09. (NOTE: Patch 9 is the minimum requirement. For optimal operation, the store should also apply all additional patches up through SP1. These patches are non-cumulative and must be installed individually, one at time, in the correct numeric sequence.)
- Download and unzip the FDMS program files, and upload them to your web host.
- Run the automatic Install program (or if you have made custom modifications, manually install using Manual Install instructions in Appendix B).
- Change file permissions to 777.
- In the Admin, activate the FDMS Admin menu and Checkout Success modules
- (Optional) Using your store’s Admin, and the newly activated File Distribution menu, make any configuration changes desired.
- Return file permissions to normal.
- Create a test downloadable product in the catalog.
- Test, test, test!
- When you are certain the new FDMS program is functioning properly in your test or mirror store, copy the files to your live store or launch your newly modified store.
| DANGER: DO NOT SKIP STEPS 1-4 ABOVE. NEVER MODIFY YOUR STORE WITHOUT FULLY BACKING UP FIRST. |
| We ALWAYS recommend that you first do a test install on a separate development site or “copy” of your store, NOT to your live store. |
Installation time and difficulty:
![]()
Uploading, installing and configuring the Admin will require about 1 hour for a person with moderate skills and experience with the necessary tools.
If you do not have the prerequisite experience to install this program yourself, there are many alternatives:
| Get free technical assistance in the forums at www.creloaded.com | |
| Move your web hosting to www.chainreactionweb.com where the experts can do it quickly and easily for you for a small fee. | |
| Post your project to the community at crelance.com and have freelancers bid on it. |


