FDMS Manual - Section III
Detailed Instructions
a) Automatic Installation and Setup:
Installation Step 1. Verify that your web hosting environment meets the minimum requirements for the FDMS program.
Contact your web host to be certain your store is operating in the following environment. If not, see if they will make the necessary modifications (i.e. upgrade their version of a program such as PHP) or move your store to a web host with an adequate environment.
| NOTE: We recommend that you use a web host that specializes in CRE hosting. |
Required Software:
CRE Loaded 6.2+ store
If version CRE Loaded 6.2, Patch 9 MUST installed and fully tested
PHP 4.1 or greater with:
- GD Library
- mCrypt
- Register Globals set to ON by using either httpd.conf, php.ini or .htaccess
The Linux Operating System, and
phpMyAdmin or another MySQL management program
Optional Recommended Software:
A php editor program
A code comparison program
WinZip or another compression program, and
An FTP program
Installation Step 2. Verify that your store is not modified with ANY custom programming or changes since it was originally installed.
These instructions are written for a store that has not been modified since it was originally installed. If your store has been modified, you MUST install to a separate development site or “copy” of your store. See the CRE Loaded Knowledgebase for instructions on how to set up a separate development site.
Installation Step 3. Make a complete backup of your store using your store’s Admin Tools - Backup, and then back up all of your store files using your FTP program.
You must back up your database and your entire store before attempting to install this program.
| DANGER: NEVER MODIFY YOUR STORE WITHOUT FULLY BACKING UP FIRST. |
| In addition to your full backup, we ALWAYS recommend that you first do a test install on a copy of your store, NOT to your live store. ONLY after you are certain the separate development site is operational should you copy it to the live store. |
A. Back up your database using your store’s Admin.
From your store’s left-column Admin menu, select Tools – Backup MySQL.
Click the BACKUP Button, then choose “Use ZIP” (to be able to open the copy on your personal computer) or “Use GZIP” to store and open it on your web server.
| NOTE: Do not check “Download without storing on server” because you will download the copy to your personal computer in step B. |
B. GET a full backup.
Open your FTP program such as CuteFTP, log onto your store, and GET a full backup of your store files. This will include a full copy of the database you just saved in step A.
Installation Step 4. Install any patches necessary up so your store is current through at least Patch 09.
NOTE: Patch 9 is the minimum requirement. For optimal operation, the store should also apply all additional patches up through SP1. These patches are non-cumulative and must be installed individually, one at time, in the correct numeric sequence.
We recommend that you check the CRE Loaded website regularly and always keep your CRE Loaded site updated to the most recent patch.
Follow the instructions included with each patch and thoroughly test your store before proceeding further.
| Do not proceed until you have verified that your store is functioning properly after patching. |
Installation Step 5. Download and unzip the FDMS program files.
Double-click the file FDMS.zip and save (unzip) a copy to your computer. Keep the original file FDMS.zip as a backup. Using your FTP program, upload the new files to your web host.
Installation Step 6. Run the automatic Install program.
Run the automatic Installation program in your browser by going to your website and typing in the following:
http://www.yourstorename.com/install_FDMS/index.php
| If your store has been modified in any way, do not run the automatic installation program on your live store. You must install it to a separate development site or “copy” of your store. See the CRE Loaded Knowledgebase for instructions on how to set up a separate development site. |
| How can I tell if my store has been modified? If you have manually added any contribution that did not come with the program (one that was NOT pre-installed from the Admin), your store is considered “modified.” |
Installation Step 7. Temporarily set File Permissions to 777.
To set the permissions, enter your website ftp address in your FTP client. In the root directory, select "Properties" from the drop-down menu and change the value listed for Permissions to 777. Click "Apply" and "OK".
Installation Step 8a. Make the FDMS Menu visible in the Admin using the Administrator - File Access menu.
From your Admin’s left-column navigation, select the ADMINISTRATOR – File Access menu. Then click Fdm_library as shown below so it is selected in the Action column.
Click the GREEN Button in the Status column to turn the FDMS Library program ON so it will be visible in your Admin:
 |  |
Simply click the green button to display the menu in the Admin or the red button to hide it. When the red button is selected, the menu and sub-menus will be hidden from the Admin.
Installation Step 8b. (Optional) Enable customers to download immediately after purchase from the Checkout Success menu with the Modules - Checkout Success menu.
 | From your Admin’s left-column navigation, select MODULES – Checkout Success. |
| If you skip this option, after purchase customers must figure out that they must click “My Accounts” to download their purchase. |
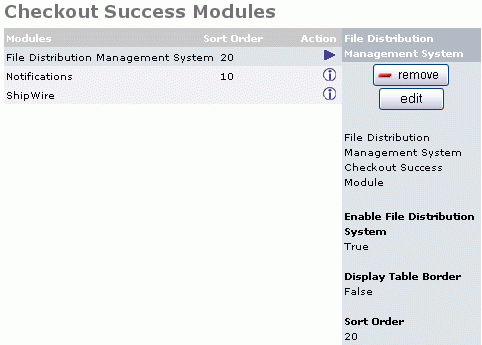
To enable customers to download immediately after purchase from the Checkout Success screen, select it in the Action column by clicking it, then click the EDIT Button:
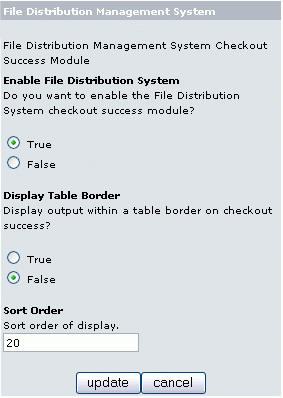 |
Select TRUE to turn on the Checkout Success menu during customer checkout or FALSE to turn it off. If turned OFF, after purchase the customer must figure out that they must click “My Accounts” in order to download the file(s) they just purchased. If you want the downloads box on the Checkout Success page to be highlighted with a border, select TRUE. Otherwise leave at FALSE. If you wish the downloads box on the Checkout Success page to be first on the page (i.e. above the Notifications box) enter 1, second enter 2, etc. NOTE that zero will display higher than a 1. When you have finished, click the UPDATE Button. |
Installation Step 9. (Optional) Using your store’s Admin, and the newly activated File Distribution menu, make any configuration changes desired.
If you have made changes to the default configuration (such as changing the name of the directory /library/ to another name), you must specify the directory for the program to use in the configuration menu. Please see the Admin Procedures chapter on the Configuration.
Installation Step 10. Return File Permissions to normal.
To set the permissions, enter your website ftp address in your FTP client. In the root directory, select "Properties" from the drop-down menu and change the value listed for Permissions back to 444. Click "Apply" and "OK".
Installation Step 11. Using your store’s Admin, create a test download product in the Catalog – Categories/Products menu.
Please see the Admin Procedures chapter for full instructions on creating your first downloadable product.
Installation Step 12. Test, test, test! Register as a customer in your store and make test purchases of the test product.
Check to see if the following are visible in your store:
File Library Infobox
Checkout Success Downloads Box after customer login and purchase of downloadable product
Downloads information box on bottom of catalog’s downloadable product page
Downloads information on My Accounts page after login and purchase of downloadable product
Installation Step 13. When you are certain the new FDMS program is functioning properly in your test or mirror store, launch your newly modified store. If you installed to a separate development site or copy of your store, back up and then copy the files to your live store.
Congratulations!
If you have had any difficulty, please see the Support/Problems/Bug Reporting section in the Introduction for assistance.
b) Administration Procedures:
The File Distribution System (FDMS) has the same “look and feel” as other osCommerce or CRE Loaded products, so it is familiar to experienced store owners who use these products. For new users, this similar look and feel makes the learning curve short. For all administrators, it is much easier and more automatic than previous methods of managing downloads.
All routine file-distribution management is done in the Admin’s left-column navigation new File Distribution menu:
| File Library: Create folders and files of library items; move, edit or delete. New File Scan: Search the library for new downloadable files; add, edit, or delete descriptions of downloadable files; re-scan to add to file library. File Icons: Add new file icons; edit or delete the 16 file type icons included with the program. Featured Files: Allows FDMS downloadable files to be shown as featured files in your store. Reports: Five different downloads reports are available. These reports are "Top Downloads," "Attached Files," "Products w/ Attached Files," "Products w/ No Files," and "Download Log. Configuration: Make changes to the default configuration including the location of the download folder, what order status allows download, a table or detail view of downloadable files, specify icon sizes. FDMS Backup: Backs up or restores the downloadable files. |
 File Distribution Management Checklist:
After installation, management of your File Distribution System includes the following steps in this order:
| NOTE: Each of these steps is covered in detail in the section following this checklist. |
Step Description: | Admin Menu Shortcut: |
Step 1. Configure the look and behavior of your new FDMS System screens | File Distribution - Configuration |
Step 2. (Optional) If your file type (.ZIP, .MP3, .DOC etc.) is not listed in the File Icons Library, create or upload a new file type icon | File Distribution – File Library – File Icons – NEW |
Step 3. Create (or Edit, Delete or Move) a new FDMS Category for your new download | File Distribution – File Library – New Folder (or Edit, Delete or Move Folder) |
Step 4. Create (or Edit, Delete or Move File) a FDMS description of the new File and upload the Downloadable File to the Downloads directory | File Distribution – File Library – New File (or Edit, Delete or Move File to a new Folder) |
Step 5. Scan for the new FDMS File you uploaded so the system can track updates to it and ADD to File Library. | File Distribution – File Library – New File Scan (or Re-Scan), then click ADD Button |
| Step 6. Attach the file to the existing product (if necessary first create new product) | Catalog - Categories/Products, select a product and click the "ATTACH FILE" Button (if necessary first create new product in Catalog - Categories/ Products) |
Step 7. Create File Library InfoBox and turn it ON. | Design Controls – InfoBox – at bottom click INSTALL Button - in "Define Key" box enter BOX_HEADING_LIBRARY - give a name like "File Library" - set colors - click INSTALL Button; click GREEN Button to turn File Library InfoBox ON. |
Step 8. Test, test, test!
| Register as if you were a customer, purchase the downloadable product.
|
Step 9. Back up your FDMS files regularly. | File Distribution – File Library – FDMS Backup |
Step 10. Run periodic reports to assess the success of your file distribution program. | File Distribution – Reports |
Step 11. (If Needed) Restore your File Library from backup. | File Distribution – File Library – FDMS Restore. |
Step 1. Configure the look and behavior of your FDMS System screens
From the Admin’s left-column menu, select File Distribution – Configuration. This brings you to the FDMS Configuration menu.
Each selection in this FDMS Configuration menu can be changed as follows:
| Download Folder Location: Set the path for download the folder. Default is /library, change only if needed. Download Order Statuses: The order statuses to enable FDMS file download. File Listing View: Choose to display the File Listing in table view OR detail view. Default is Detail. Table View: If you choose Table View, do you want to display the following columns? Default for all is YES. Detail View: If you choose Detail View, do you want to display the following details? Max Display Results per Page Default is 10. Location of Prev/Next Navigation Bar: Default is BOTH Top and Bottom. IMAGES: Set desired size of: Required Products Listing: Should product list be in Columns (with one product per row) or Rows (Multiple products per row). Default is ROW. |
Step 2. (Optional) Create or Upload a new icon for File Type
If your file type (.ZIP, .MP3, .DOC etc.) is not listed in the File Icons Library, create or upload a new file type icon.
To create or upload a new icon for File Type, from the Admin’s left-column navigation menu, selectFile Distribution – File Library – File Icons. This brings you to the FILE ICONS Menu:
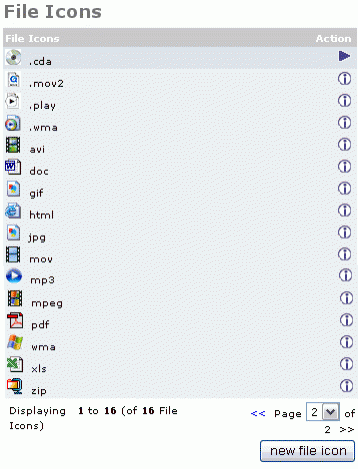
If the type of file you will be downloading is not in the list, click the NEW FILE ICON Button. This brings you to the NEW FILE ICON Menu:
| File Extension: Enter the new File Extension. Small Icon: If you want to use an icon that is already in the File Icons library, select it here.Small Image: The icon selected in the Small Icon box will replace the red “X” symbol. Large Icon: If you want to use an icon that is already in the File Icons library, select it here.Large Image: The icon selected in the Large Icon box above will replace the red “X” symbol. Upload Small Icon: Create an icon using a graphics program and save it to your computer, then click the BROWSE Button to find it on your personal computer and upload. Upload Large Icon: Create an icon using a graphics program and save it to your computer, then click the BROWSE Button to find it on your personal computer and upload.
|
Step 3. Create (or Edit, Delete or Move) a new FDMS Category for your new download
To create a new FDMS Category, from the Admin’s left-column navigation, select File Distribution – File Library. This brings you to the Library Files menu:
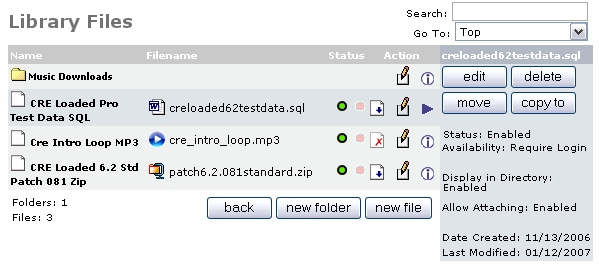
To add a new category, click the NEW FOLDER Button.
This brings you to the Library Folder Edit screen:
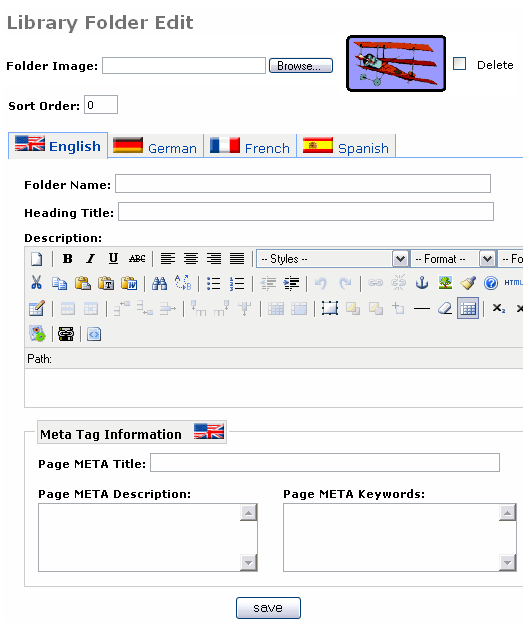
- Sort Order: If you want this category to appear first in the File Library Infobox, enter a 1, 2 to appear second, etc.
- Folder Name: Give the category a name that will appear in the File Library Infobox.
- Heading Title: What you want to display at the top of the category page.
- Description: A description in sentence format to let the customer know they have selected the correct category
- Page META Title: 10 words you wish to appear in the browser’s top title bar
- Page META Description: 1-2 sentences describing the file to help search engines find it
- Page META Keywords: Up to 1,000 characters of important words that are 100% related to the product, listed from most important to least important
Step 4. Create (or Edit, Delete or Move File) an FDMS description of the new File and upload the Downloadable File to the Downloads directory
To Create (or Edit, Delete Move or copy to another folder) an FDMS description of the new File and upload the Downloadable File to the Downloads directory, from the Admin’s left-column navigation menu, select
File Distribution – File Library. This brings you to the Library Files Menu:

Click the NEW FILE Button. This brings you to the Library File Edit screen:
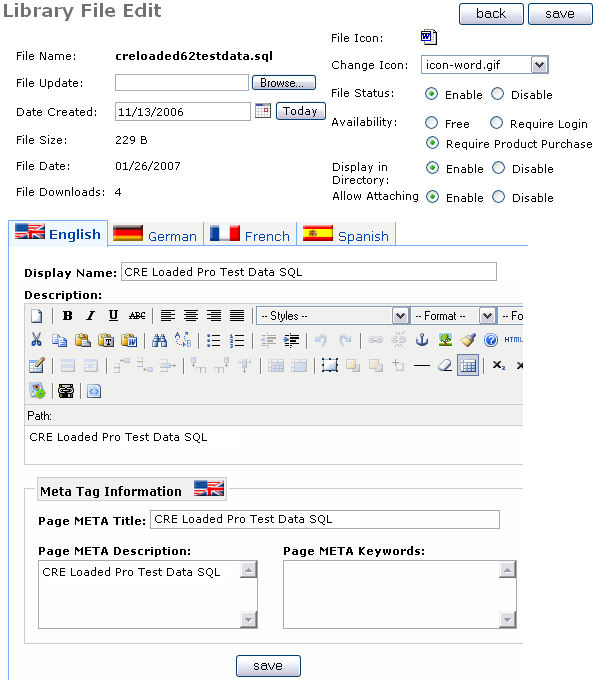
File Name:
- File Name: Click the BROWSE Button to select the file from your personal computer.
- Date Created: Click the TODAY Button or select a date from the calendar.
File Icon & Availability:
- File Icon: Displays the image selected in the next box, CHANGE ICON.
- Change Icon: Click drop-down box to select a different file icon.
- File Status: Click Enable to make available for download, Disable to hide.
- Availability: Click Free if available to any guest, Require Login for member use, Require Product Purchase.
- Display in Directory: Enable Disable
- Allow Attaching: Enable Disable
Display Name & Description:
- Display Name: Enter the file name as you wish it to be displayed.
- Description: Include a description of the file so customers can be sure they are selecting the correct file.
- Meta Tag Information
- Page META Title: 10 words you wish to appear in the browser’s top title bar.
- Page META Description: 1-2 sentences describing the file to help search engines find it.
- Page META Keywords: Up to 1,000 characters of important words that are 100% related to the product, listed from most important to least important.
After completing the above, click the SAVE Button to save.
Step 5. Scan for the new FDMS File you uploaded so the system can track updates to it.
From the Admin’s left-column menu, select File Distribution – File Library – New File Scan (or Re-Scan). This brings you to the Library File Scan menu:
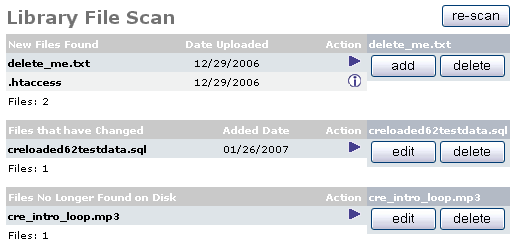
To add files to the file library, click the ADD Button.
Step 6. Attach the file to the existing product (if necessary first create new product)
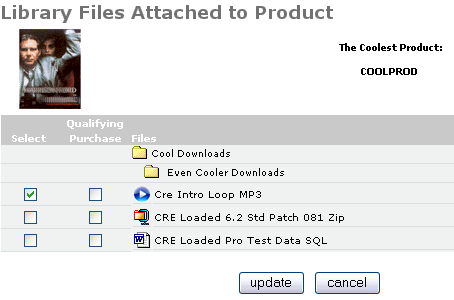
From the Admin’s left-column menu, select Catalog – Categories/Products (If necessary, create and save a new product description).
Then select the product in the Action column, and click the ATTACH FILES Button:

Step 7. Create File Library Infobox in your Catalog and turn it ON.
From the Admin’s left-column menu, select Design Controls – Infobox Configure. This brings you to the Infobox Configure menu.
Scroll all the way down to the bottom of this page. At the bottom of the screen you will see the Infobox Configure menu:

TO Install a new Infobox for the File Library, click the INSTALL Button.
This brings you to the Create a new Infobox screen:
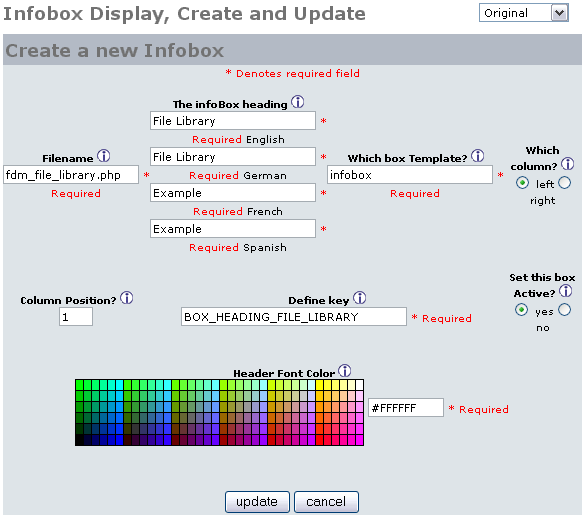
TIP: Click the "i" button next to any item for detailed help.
- Infobox Heading: This is the heading displayed in your catalog above the infobox.
- Filename: Use the drop down box to select the file fdm_file_library.php.
- Which box Template: Leave at default, infobox.
- Which Column: Choose left or right column for infobox to display.
- Column Position: If you wish to specify a location for this infobox, enter it here. If you do not enter any number, then the box will be displayed alphabetical first. You may also change locations in the next screen, Infobox Display, Create and Update.
- Define Key: Critical for program to work, must type exactly as shown above.
- Set this box Active: (Optional) Click YES to be displayed in catalog now, or click NO to hide until you are finished installing FDMS. You may also turn this box ON in next screen, Infobox Display, Create and Update.
- Header Font Color: Click or specify the font colored desired.
- Click the UPDATE Button.
This returns you to the Infobox Display, Create, and Update Screen.
To turn the File Library Infobox ON, in the Activate Box column and the File Library Infobox row, click the GREEN Button:

Step 8. Test, test, test!
Finally, make some test purchases to be sure you have completed each step! Temporarily install a payment method like “COD” so you don’t go broke testing. Then register as if you were a customer, purchase the downloadable product, and see how it works.
Step 9. Back up your FDMS files regularly.
From the Admin’s left-column menu, select File Distribution – FDMS Backup. This brings you to the Infobox Configure menu.
To make a new backup of your File Distribution System, click the BACKUP Button. This brings you to the NEW BACKUP Menu:
| To get an exact copy of the file, select NO COMPRESSION (Pure SQL). To conserve file space on your web host or personal computer, and save file download time, select USE GZIP. If you wish to save a copy directly to your personal computer, select DOWNLOAD ONLY. If you do not check this box, a copy will be stored on your web server only. When you have finished making your selections, click the BACKUP Button.
|
Step 10. Run periodic reports to assess the success of your file distribution program.
Six reports are available:
| Top Downloads: See how many times your files have been downloaded. Attached Files: List of which files are attached to which products. Products w/ Files: Products that have downloadable files attached. Products w/No Files: Products that have no downloadable files attached. Download Log: Log of actual downloads. Daily Downloads of File: How many times each day your files have been downloaded. |
Top Downloads Report
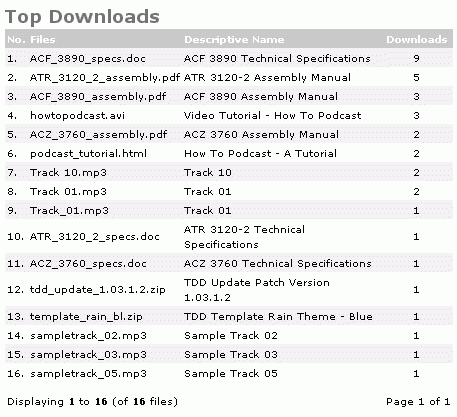
To see how many times your files have been downloaded, select the Top Downloads Report:
Attached Files Report
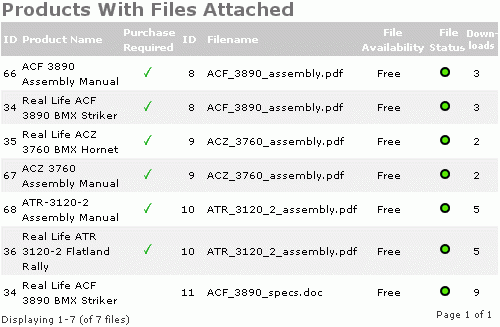
To see a list of which files are attached to which products, select the Attached Files Report:
Products w/No Files Report
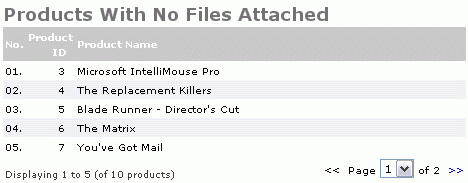
To see a list of products that do not have files attached, select the Products w/No Files Report.
Download Log Report
To see a list of downloads, the downloaded file name, IP Address, Customer ID, time downloaded, and page downloaded from, select the Download Log Report:

Daily Downloads of File Report
To see how often each file has been downloaded per month and per day, select Daily Downloads of File. This will show you a list of downloads, unique downloads, and averages by month; select a month to see the downloads and unique downloads by day. Use the drop-down menu to view reports for a specific file.

Step 11. (If Needed) Restore your File Library from backup.
From the Admin’s left-column navigation menu, select File Distribution – File Library. This brings you to the FDMS Database Backup Manager menu.
Click the FDMS RESTORE Button. This brings you to the FDMS Restore menu:
| To restore your downloadable files, click the RESTORE Button. Note that any files already in the destination folder will be over-written.
|
c) Upgrading FDMS:
The FDMS database was updated in early April 2008 to improve file scan logic. All users prior to v1.3.3 need to upgrade their FDMS installation.
The new install is non destructive, but you should still always back up your database before making any changes or upgrades.
To upgrade to FDMS v1.3.3: Re-run the automatic install program (see Step 6 above) to get the database change.
This completes the FDMS detailed instructions! We hope you enjoy your new file distribution management system.


