In-Store Promotions
This section shows you how to feature products, drive customers to related products, send notifications and newsletters, and a variety of other ways to increase sales to current customers.
3.1 Featured Products
Featuring a product is the online equivalent of displaying it in a store window. CRE Loaded not only lets you feature products in your store, it lets you choose where they will be displayed -- in a side Infobox, at the bottom of your main page, or both.
If you feature more than one product, CRE Loaded will rotate through them at random, displaying a different product each time a customer loads the page.
To feature a product, go to Admin => Catalog => Featured Products, and click "New Product." Select the product you wish to feature from the drop-down menu. If you wish to feature the product for a specific amount of time, enter the date you want to stop featuring the product in the Expiry Date field. Click "Insert" when you are done.
To display featured products in an Infobox, go to Admin => Design Controls => Infobox Configure. Highlight the line "Featured" and click "Edit." Configure the Infobox settings and click "Update" when you are done. (See Customizing Your Store Section 4.5: Selecting and Displaying Infoboxes for information on working with Infoboxes.)
To display featured products on the main page, go to Admin => Design Controls => Template Configure. Make sure your template is selected, then click "Edit." Under Select Modules for Catalog index page, select "featured.php" from one of the drop-down menus. Click "Save" when you are done. (See Customizing Your Store Section 1.6: Setting Contents of the Main Page for information on designing your main page.)
3.2 Shop by Price
Shop by Price lets your customers browse through all of your products that fall in a certain price range -- for instance, everything you sell that costs between $10 and $20.
To begin, determine the ranges you want use. As an example, you might want to use ranges of $0-$20, $20.01-$30, $30.01-$40, and $40.01-$50. This is 4 ranges. You can also set a range such as "$50.01 and above." Note that this will not count as a range, so if you added this to the ranges already specified, you would still only have 4 ranges.
To use this feature, you must first turn on the "Shop By Price" Infobox. See Customizing Your Store Section 4.5: Selecting and Displaying Infoboxes for information on working with Infoboxes.
Once you have turned on the Infobox, go to Admin => Catalog => Shop by Price:

Highlight Shop by Price Options and click "Edit."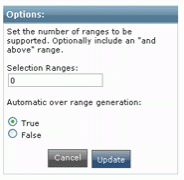
Selection Ranges: Enter the number of ranges you want to use -- remember not to include a range such as "$50 and over" in your count.
Automatic Over-Range Generation: If you are going to use a range such as "$50 and over," select "True."
Click "Update" when you are ready to continue.
Now highlight Shop by Price Ranges and click "Edit:"
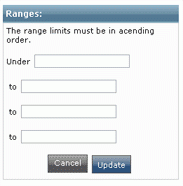
Enter the upper limits of each range in the fields, in increasing order. For the ranges listed in the example above, you would enter: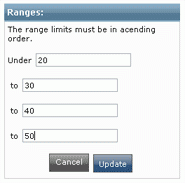
If you view your catalog now, you will see an Infobox like this: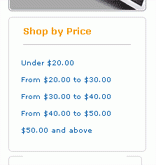
If you wish to stop using Shop by Price, go to go to Admin => Catalog => Shop by Price => Shop by Price Options and set the number of selection ranges to 0.
3.3 Cross-Sell Products
This is a very useful module that can dramatically increase your sales by suggesting related products on a given product's page. For instance, on the product page for a DVD, you might cross-sell a sequel to that movie, or another movie in the same genre or by the same director.
Go to Admin => Catalog => Cross-Sell Products. You will see a page similar to this listing all of your products:
You will notice that in this example we are cross-selling a DVD of the movie "Under Siege 2" on the product page for the "Under Siege" DVD.
To cross-sell, click "Edit" beside the Product on whose page you want to suggest other products. Here, we are going to cross-sell another product on the page for the "Blade Runner" DVD: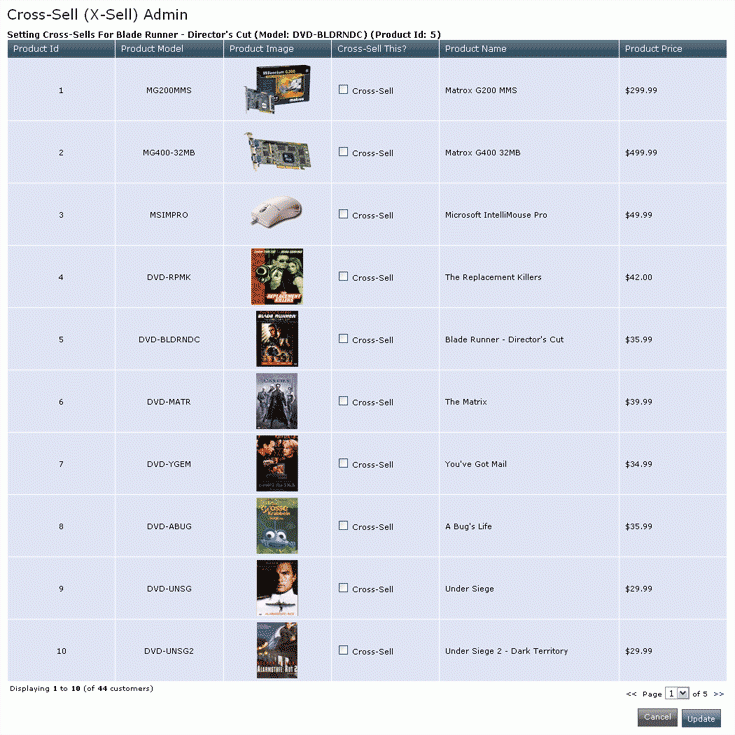
Simply select the "Cross-Sell" checkbox beside any product you want to suggest. You can cross-sell as many products as you want on any given product page.
Click "Update" when you are done.
3.4 Cross-Sell Articles
You can also cross-sell articles to products -- any products mentioned in an article can be featured at the bottom of the page, so that customers can click directly on products rather than having to search for them in your catalog.
To cross-sell articles to products, go to Admin => Article Manager => Cross-Sell Articles. This menu works just like Cross-Sell Products: select the article, then select the products you wish to cross-sell. Click "Save" when you are done.
3.5 Email Customers
One way to increase sales and customer retention is to keep in touch with your customers and let them know about new products, special sales, or other events that can bring them back to your store. CRE Loaded lets you send not only standard email but HTML-formatted email that looks more professional.
Because you will almost certainly end up sending the same kind of email quite often -- responses to customer inquiries, order status updates, etc. -- CRE Loaded lets you create a list of stock subjects for these standard emails.
Go to Admin => Tools => Email Subjects:
To create a new subject, click "Enter." Enter the subject in the Email Subject Name field. Under Email Subject Category, enter "1" if emails using this subject will be initiated by you (for instance, notices about sales or special offers) or "2" if emails using this subject will be in response to a customer’s email (for instance, an inquiry about an order or a product).
When you are done, click "Save."
To edit an existing subject, highlight it in the list and click "Edit."
To send an email, go to Admin => Tools => Send Email. Select the customer(s) you want to email from the drop-down list or enter an email address, enter a subject or select a stock subject from the drop-down list, then write your email in the text editor. You can fully format the email, but note that any special formatting will not be visible to customers who receive emails in plaintext.
When you are ready to send the email, click "Send Email." It is a good idea to send the email to yourself first so you can double check that it reads and looks exactly the way you want it to. Once you are sure everything is perfect, then send it to the customer(s).
 | Note: Be very careful when sending out email to all customers. In addition to annoying customers and driving them away with unsolicited email, you could also be in violation of the U.S. CAN-SPAM Act of 2003. You should check with your attorney for specific information about the provisions and requirements of this law |
If you want to send out a promotional email to all customers informing them of a sale or other special event, try the Newsletter Manager instead.
3.6 Newsletter Manager
The Newsletter Manager lets you create professional-quality promotional newsletters. This is very similar to sending emails (above), but this module gives you more control over the creation and distribution of your message.
Customers have the option to subscribe to your newsletters when they create a customer account; they can also subscribe or unsubscribe at any time by editing their customer account. See Customer Management Section 1: Adding a New Customer for more details.
Go to Admin => Marketing =>Newsletter Manager and click "New Newsletter." Select the type of newsletter from the Module drop-down menu, enter a Title, then create your newsletter in the Content text editor. Click "Save" when you are done.
Note: Because of the security time-out feature in your CRE Loaded Admin, it is a good idea to create your newsletter in a word processor, then copy and paste it into the Newsletter Manager. If you prefer to work in the CRE Loaded Newsletter Manager, be sure to save your work every few minutes!
The Newsletter Manager lists all existing newsletters.
To prevent you from accidentally sending a newsletter that you are not finished creating, every newsletter is initially "unlocked." Note on the screen above that the newsletter called "news letter 1" has an open lock in the Status column, and the only options are "Preview" and "Lock." The Newsletter Manager requires you to lock a newsletter before it can be edited or sent out.
Now that "news letter 1" has been locked (note the closed lock icon in the Status column), option buttons appear that let you edit your newsletter and preview its final appearance as much as you want. Until you are ready to send a newsletter out, it is a good security precaution to always unlock it after saving the most recent changes. When you are satisfied with your newsletter, save it, lock it, and click "Send." You will see a preview of the newsletter and the number of customers receiving it. Click "Send" again to confirm, and the newsletter will be sent to all subscribers.
3.7 Product Notifications
Customers can sign up to receive updates and notifications about products they order. You can alert them to new editions or versions of a product, related accessories, similar products -- anything you wish.
When you enable product notifications, customers will see a screen like this one during checkout:
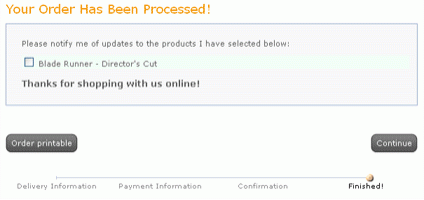
To enable product notifications, go to Admin => Modules => Checkout Success. Select "Notifications" and click "Install," then click "Edit" to configure product notifications.
Enable Product Notifications: Select "True" to enable the module.
Display Table Border: Select "True" to display a border around the product notification box, as in the example shown above.
Sort Order: Enter the order in which you want this module applied during the checkout process.
Product notification requests are managed through the Admin => Reports => Prod Notifications. See Store Management, Section 2.10 for complete information.

