Content Management
CRE Loaded is more than just an online store program, and has much more to offer you and your customers than just a catalog and a shopping cart. With CRE Loaded you can post customer reviews of Products, Articles to help your customers choose or use a Product, documentation, and a FAQ (Frequently Asked Questions) section where you can post information about common store-policy and customer-service questions. All of this works together to make your website more than just a store -- it can transform your website into a comprehensive "destination" that will bring your customers back time and time again, increasing both customer loyalty and your sales!
3.1 Reviews
If you choose, you can let customers post reviews of products. Reviews can be very helpful to other customers, giving them additional information they can use in deciding among products.
To allow customers to post reviews, go to Admin => Design Controls => Infobox Configure. Find "Reviews" and configure and turn on the Infobox. (See Customizing Your Store: Section 4.5 for instructions on working with Infoboxes.)
While you should not get in the habit of censoring reviews -- even bad reviews can help other customers in their product-selection process, perhaps driving them to a higher-margin item in your store -- it is a good idea to check the customer reviews periodically. Sometimes you may find a review that is inflammatory, obscene, or otherwise undesirable (perhaps it refers to the wrong product, or does not even mention a product at all). In such cases, you may want to remove a review from your site.
To do this, go to Admin => Catalog => Reviews. Highlight the review and click either click "Edit" to remove any offensive comments or "Delete" to remove the review entirely.
3.2 FAQ Manager
FAQs ("Frequently Asked Questions") have become a standard item for just about any ecommerce business, and CRE Loaded makes it simple for you to set up and manage your own FAQ. The FAQ is where you put customer-service contact information or store policies for regarding billing, shipping, and returns; legal information such as terms and conditions; hours and directions for a brick-and-mortar store; or anything else that customers may want to know.
If you aren't sure what to put in your FAQ or how to organize it, visit some of your favorite online stores and look at their FAQs.
If you only have a few entries, you can keep them all on one page. But if you want a large, comprehensive FAQ, CRE Loaded lets you create FAQ categories to organize the information. These categories will display on your main FAQ page, and Customers will see the individual FAQs when they click on a category listing.
To create FAQ categories for your CRE Loaded store, go to Admin => Content Director => FAQ Categories. (CRE Loaded 6.3 Standard and all earlier (v6.2 or older) installations without Content Director go to Admin => Content Manager.) Click "New Category" and enter the Name and Description for the category, add an image if you want, and click "Save" when you are done.
Once you have created your FAQ categories, you will create the individual entries in Admin => Content Director => FAQ Manager. Click "Insert."
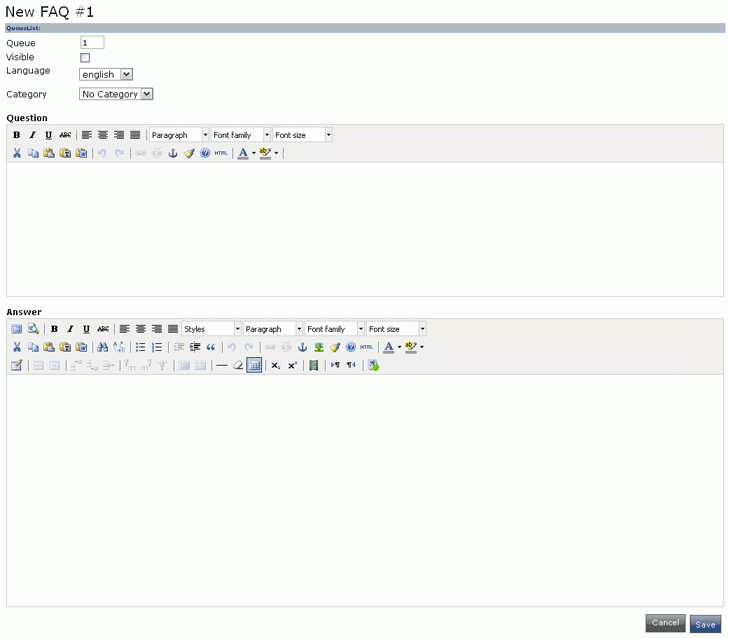
Queue is the same thing as sort order -- entries will appear in order with 1 first, 2 second, etc.
Click the box for Visible to display the question and answer. If for some reason you want to remove a question from the FAQ temporarily, unchecking this box will prevent the information from being displayed but will keep it in your database so you won’t have to re-type everything should you decide to display the information again.
Be sure to select the proper Language for your FAQ entries.
If you have created categories for your FAQ, select the Category for the entry from the drop-down menu.
Enter the text for the Question and the Answer in the appropriate fields. You can format the text any way you want using the wysiwyg editor. Note that you can have a maximum of 512 characters for the question; the answer, however, can be as long as necessary to convey all of the information.
When you have finished creating your FAQ entry, click "Save."
3.3 Article Manager
Articles are a great way to provide that "something extra" that will keep your customers coming back to your site again and again. Articles can be news about new products or upcoming sales, tips and tricks for using a product, a guide to choosing the product that best suits a customer's needs, or anything else you want to write about. You can even use the Article Manager as a blog to give your online store a more personal feel.
The Article Manager displays an Infobox on your site.
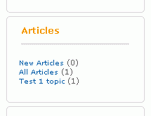
The Infobox lists the total number of articles, the number of new articles, and the different topics you have created.
If you click on a topic, all of the articles in that topic are displayed, along with a short summary and the author. Clicking on the title takes you to the full article. Clicking on the author's name takes you to a list of all articles by that author.
Articles are created with the same wysiwyg editor you use to create your product descriptions, so you can format the text any way you like, add html or images, links to products in your store or to external websites (such as a manufacturer's), etc.
3.3.1 Configuring the Article Manager
To begin creating articles, you should first configure the Article Manager Infobox. Go to Admin => Design Controls => Infobox Configure and find "Articles." Select the position in which you want the Article Infobox to appear on your site. For more information on working with Infoboxes, see Customizing Your Store, Section 4.5.
Next, go to Admin => Article Manager => Configuration:
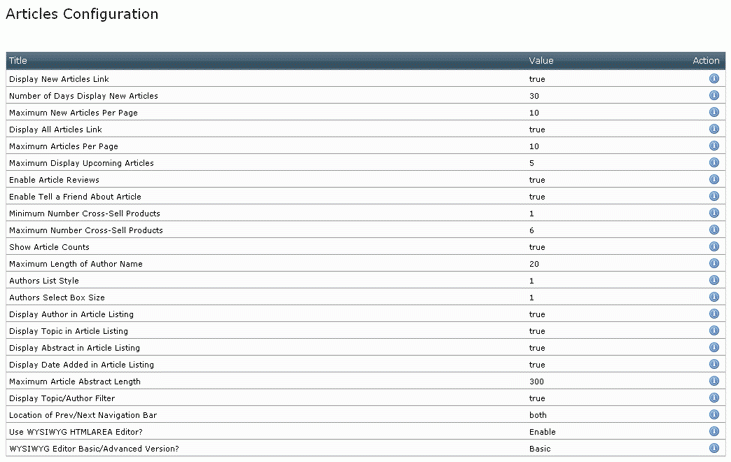
The options are fairly self-explanatory; should you want to change any of the settings, select the option and click "Edit."
3.3.2 Create Authors
Before you can add articles, you must add at least one author. Go to Admin => Article Manager => Authors and click "Insert." Fill out the information (be sure to use the fields for the appropriate language) and click "Save."
If you do not want to use authors, go to Admin => Article Manager => Configuration. Set "Maximum Length of Author Name" to "0" and "Display Author in Article Listing" to "False."
3.3.3 Create Topics
You must create at least one topic for your articles, even if it simply "Articles." Go to Admin => Article Manager => Topics/Articles. Click "New Topic" and enter the Topic Name, Heading, and a short Description in the appropriate fields. When you are finished, click "Preview"; check over the information as it will be displayed and click "Insert" to accept it or "Back" to make any changes.
3.3.4 Create Articles
Once you have created a topic in which to place your article, go to Admin => Article Manager => Topics/Articles, select the folder for the topic, and click "New Article."
Article Status must be set to "Published" in order for the article to appear on your site. If you are still working on an article and are not yet ready for it to appear, set its Status as "Draft."
If Date Expected is set to a date in the future, the article will not appear on your site until that date even if its status is set to "Published." If you have set Maximum Display Upcoming Articles (in Admin => Article Manager => Configuration) to any value greater than 1, the Article Manager InfoBox will display a list of any articles whose Date Expected is a date in the future.
Select an Author from the drop-down menu.
Create your article in the WYSIWYG editor as you would a product listing, then click "Preview" when you are done. Check the article, and click "Insert" to accept it or "Back" to make any changes.
3.3.5 Managing Article Reviews
If you have enabled articles reviews in the Article Manager configuration (see Section 3.3.1), your customers will have the opportunity to submit reviews of articles, just as they can for products.
You must approve article reviews before they will appear on your site. To do this, go to Admin => Article Manager => Article Reviews. You will see a list of reviews by the title of the article they review, along with their rating (1 to 5 stars). Highlight a review and click "Approve." You can also click "Edit" to read the review before you approve it.
Just as with product reviews, you may occasionally find an article review that is inflammatory, obscene, or otherwise undesirable. You can edit these reviews to remove such problems or just delete them by clicking either "Edit" or "Delete."
3.3.6 Cross-Sell Articles to Products
If an article mentions one or more products in your store, you can link the article directly to the product pages, or "cross-sell" it, so that images of the products will appear below the article in a separate box titled "Products Related to this Article:".
Go to Admin => Article Manager => Cross-Sell Articles. You will see a list of every article on your site and any products associated with each article. To cross-sell an article to a product, click "Add/Remove" in the cross-sell actions column for that article. This will display a list of every product in your store. Check every product you wish to associate with the article, and click "Save."
If you associate more than one product with an article, the cross-sell actions column will display a "Sort" action. Click this and you will be given a list of the associated products; beside each product is a drop-down menu to set the sort order. Click "Save" when you are done.
3.4 Information Manager
CRE Loaded 6.3 Professional and Professional B2B include the CRE Loaded Content Director System to fully integrate all content management. The Content Director is available as an Add-On System for CRE Loaded 6.3 Standard and all earlier versions of CRE Loaded, but many of its page-creation features are available for users of these CRE Loaded carts through the Information Manager.
Like the Article Manager, the Information Manager lets you add pages with anything you want on them. The Information Manager, however, is generally reserved for company-specific items such as your terms and conditions, privacy statement, an "About Us" page, contact information or directions to your brick-and-mortar store, etc. Pages you create in the Information Manager will display on your site in an Infobox titled "Information."
To change the position of the Information Infobox on your page, go to Admin => Design Controls => Infobox Configure and find "Information." Select the position in which you want the Article Infobox to appear on your site. For more information on working with Infoboxes, see Customizing Your Store, Section 4.5.
To see the Information Infobox, go to Admin => Content Manager => Info Manager (the Content Director System manages these same pages through Admin => Content Director => Page Manager).

In the example above, three pages are listed. To edit an existing page, click the pencil-and-paper icon in the "Action" column. To delete an existing page, click the recycle icon in the "Action" column. To temporarily hide an existing page without deleting it, click the red dot in the "Public" column.
To add a page to the Information Infobox, click "New":
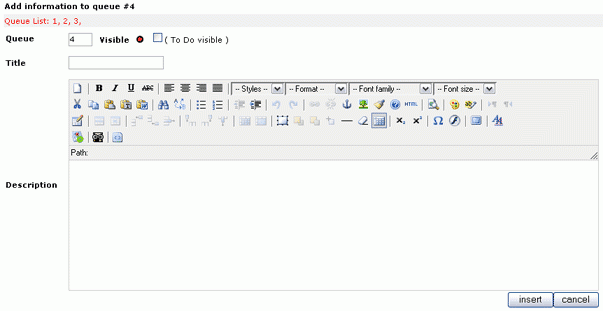
Queue is the order in which the pages are listed in the Information Infobox.
Initially, the page is not Visible (note the red dot). To display the page, click the box beside (To Do Visible). Alternatively, you can also turn the page on by clicking the green dot under "Public" on the main Information Manager page.
Add the Title to display in the Information Infobox, then create your page in the Description editor. Click "Insert" when you are done.
Another page that is accessible through the Information Infobox is the "Contact Us" page, which includes all of the different contact information for your store along with a form your customers can use to contact you:
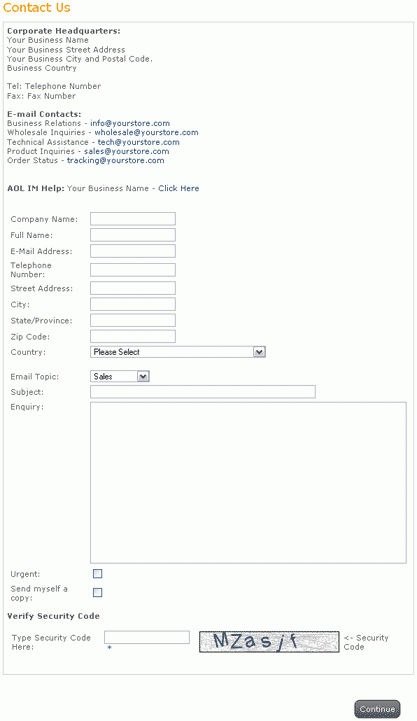
To add your contact information here or otherwise change the contents of this page, you must edit the file includes/languages/english/contact_us.php. Go to Admin => Tools => Language Editor, select "Full Page Editor," and choose the contact_us.php file.
Note that the Full Page Editor lets you edit not only the text of the page, but the programming content as well, so be very careful when modifying the code. Change only the display text and the HTML links. The Full Page Editor is for advanced users only, and if you make an error when using it you can disable or ruin the form, or even prevent this page from appearing at all. Unless you are absolutely sure you know what you are doing, it is best to hire a professional to edit these files for you. See Customizing Your Store, Section 5 for more information on using the language editor.
3.5 Events Manager
The Events Manager lets you display an Infobox with a calendar of sales, promotions, store closings, or anything you want to schedule.
To change the position of the Infobox on your page, go to Admin => Design Controls => Infobox Configure and find "Upcoming Events." Select the position in which you want the Upcoming Events Infobox to appear on your site. For more information on working with Infoboxes, see Customizing Your Store, Section 4.5.
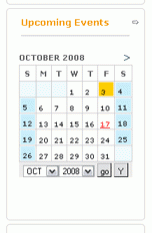
The current date is highlighted in yellow, and any events you have scheduled appear in red.
To create an event, go to Admin => Marketing => Events Manager and click "New Event."
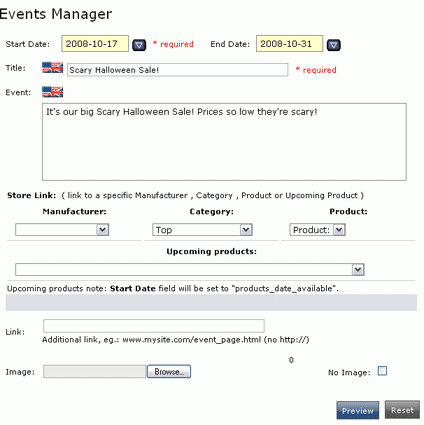
Enter the Start Date and End Date of the event. If the event only lasts for one day, you can leave end date blank.
Enter a Title and a description of the Event.
In the OSC Link box you can create a link on the event-notification page to a specific manufacturer, category, or product, or to an upcoming product. This last link lets you announce a product before it actually becomes available in order to generate interest.
You can also add a Link to any page on your site or to an external website. You can also insert an Image.
When you have finished creating the event, click "Preview" to check it over. If you are satisfied, click "Insert," or click "Back" to make changes.

